Installing two roofs – why bother?

Most people assume that the visible external roof covering is the “real” roof, which functions to keep the water and weather out of the roof system.  This is true for flat or low-slope roofing materials, but not true for steep-slope materials (which is anything over a 3:12 roof slope).  Steep-slope materials are designed to shed water.  That means that water is supposed to run off the surface, and if properly layered, the water stays on the outside.  However, if wind or a physical obstruction interrupts the water flow, then it will go under the roofing material.  This is true for all steep-slope roofing material, whether it is made of asphalt shingles, or metal shingles, or metal panels, or cedar shakes, or slate.

It’s the unappreciated and unloved underlayment layer that’s below the top layer that has the job of actually keeping the water out.  That layer is the “true” waterproof roof, which is composed of layering of flashings, membrane, underlayment, and sealants.  It’s also the layer which is easiest to skimp on when the contractor is being pressed to come up with a low price.   If you can’t see it, and you don’t even know that it needs to be there, then why would you want to pay for it?

How does the saying go?  Ah yes.  Penny-wise, pound foolish.

Continue reading

Stripping is a good thing. Really.

Roof stripping, that is.  This is the process of getting rid of the old roof covering material, down to the deck.  In the process, if done correctly, you’ll learn a lot of things about what worked on your roof and what didn’t.  As all things that are good for you, there are costs and inconveniences involved, aspects which are exploited by those contractors who don’t have your best interests at heart.

What are some of the typical reasons you’re given why leaving your old roof on and going over is/are acceptable?  They include:

  • You’re saving money.
  • It’s more ecological (no landfill waste!).
  • It’s more secure.
  • It provides another layer of protection to your roof.
  • It’s recommended by the manufacturer.
  • There’s much less residual mess to clean up.

So many great reasons why you should just leave the old roof on, and go over!  And yet, pretty much all of these are false, based on the homeowner’s lack of knowledge of how the roof system is supposed to work, and compounded by the contractor’s desire to get the job done as fast as possible, get paid, and move on.  If you are presented with the suggestion that leaving your old roof on is an acceptable strategy, there are a number of things you should be aware of before you agree to this.

Continue reading

Metal roofing -how to choose

Various roof failures, including asphalt shingle blow-off, and premature curling and cracking, has led homeowners to look for more reliable and durable solutions.  As such, people often start asking about metal roofing.

Metal roofing continues to be more and more popular, despite its initial cost, because people are getting tired of having roofs that fail much before their warranties expire.  The metal product offerings come in a dizzying variety of materials, appearances, textures, colours, and performance.  How does one wade through all the sales claims and marketing hype to decide which options are truly the best for you?  It helps to remember that there is no product invented by humans that is truly perfect in every circumstance.  So the exercise is to find the product whose weaknesses are minimized in your particular circumstances, and whose strong points are fully delivered.  It should not be a surprise that proper preparation and installation play a very big role in the final quality of the result.  So let’s examine a selection of products and discuss how their weak (and strong) points should be considered in your selection process.

Continue reading

Foundations (of a metal roof system)

What are you talking about?  Roofs don’t have foundations.  Things stuck in the ground do.  Building do.  But roofs?  They’re up there, talking to the sky.  What need do they have for foundations?

And yet, they do.

Because roofs are structures, and structures need a base, a foundation.

Continue reading

Some myths about roofing

Most people think they have a good grasp of how roofs work – the shingles (usually asphalt) keep the water out, and that they do that by being the waterproof layer that stops water from getting in.  That’s more myth than fact.

Another myth, is that caulking is an acceptable way to achieve waterproofing.

Another myth, is that if you have ice-and-water shield on your roof, you’re good.

What all these myths have in common is that they misunderstand how a sloped roof system works in reality.

Continue reading

Metal roofing – the green solution for your house.  Or is it?

Compared to (most) asphalt shingle roofs, (most) metal roofs last much longer and perform much better, as long as they are properly installed.

Metal roofs are considered to be more ecological than asphalt roofs, as their longevity usually means that the metal roof is the last roof the home will need.  This longevity also means that fewer manufacturing resources are needed to produce this roof, compared to the resources needed for asphalt shingles over the life of the house.

However, this longevity of product may not be enjoyed by the homeowners, if the installation was not properly done.  Even if the installers followed the manufacturer’s recommended installation practice, a roof may fail prematurely IF the roof covering was not properly integrated with the rest of the house structure.

So let’s look at what “should” be taken into account when considering a roofing solution.

Continue reading

Case study – poor workmanship in an aluminum shingle roof install, investigated in 2008.

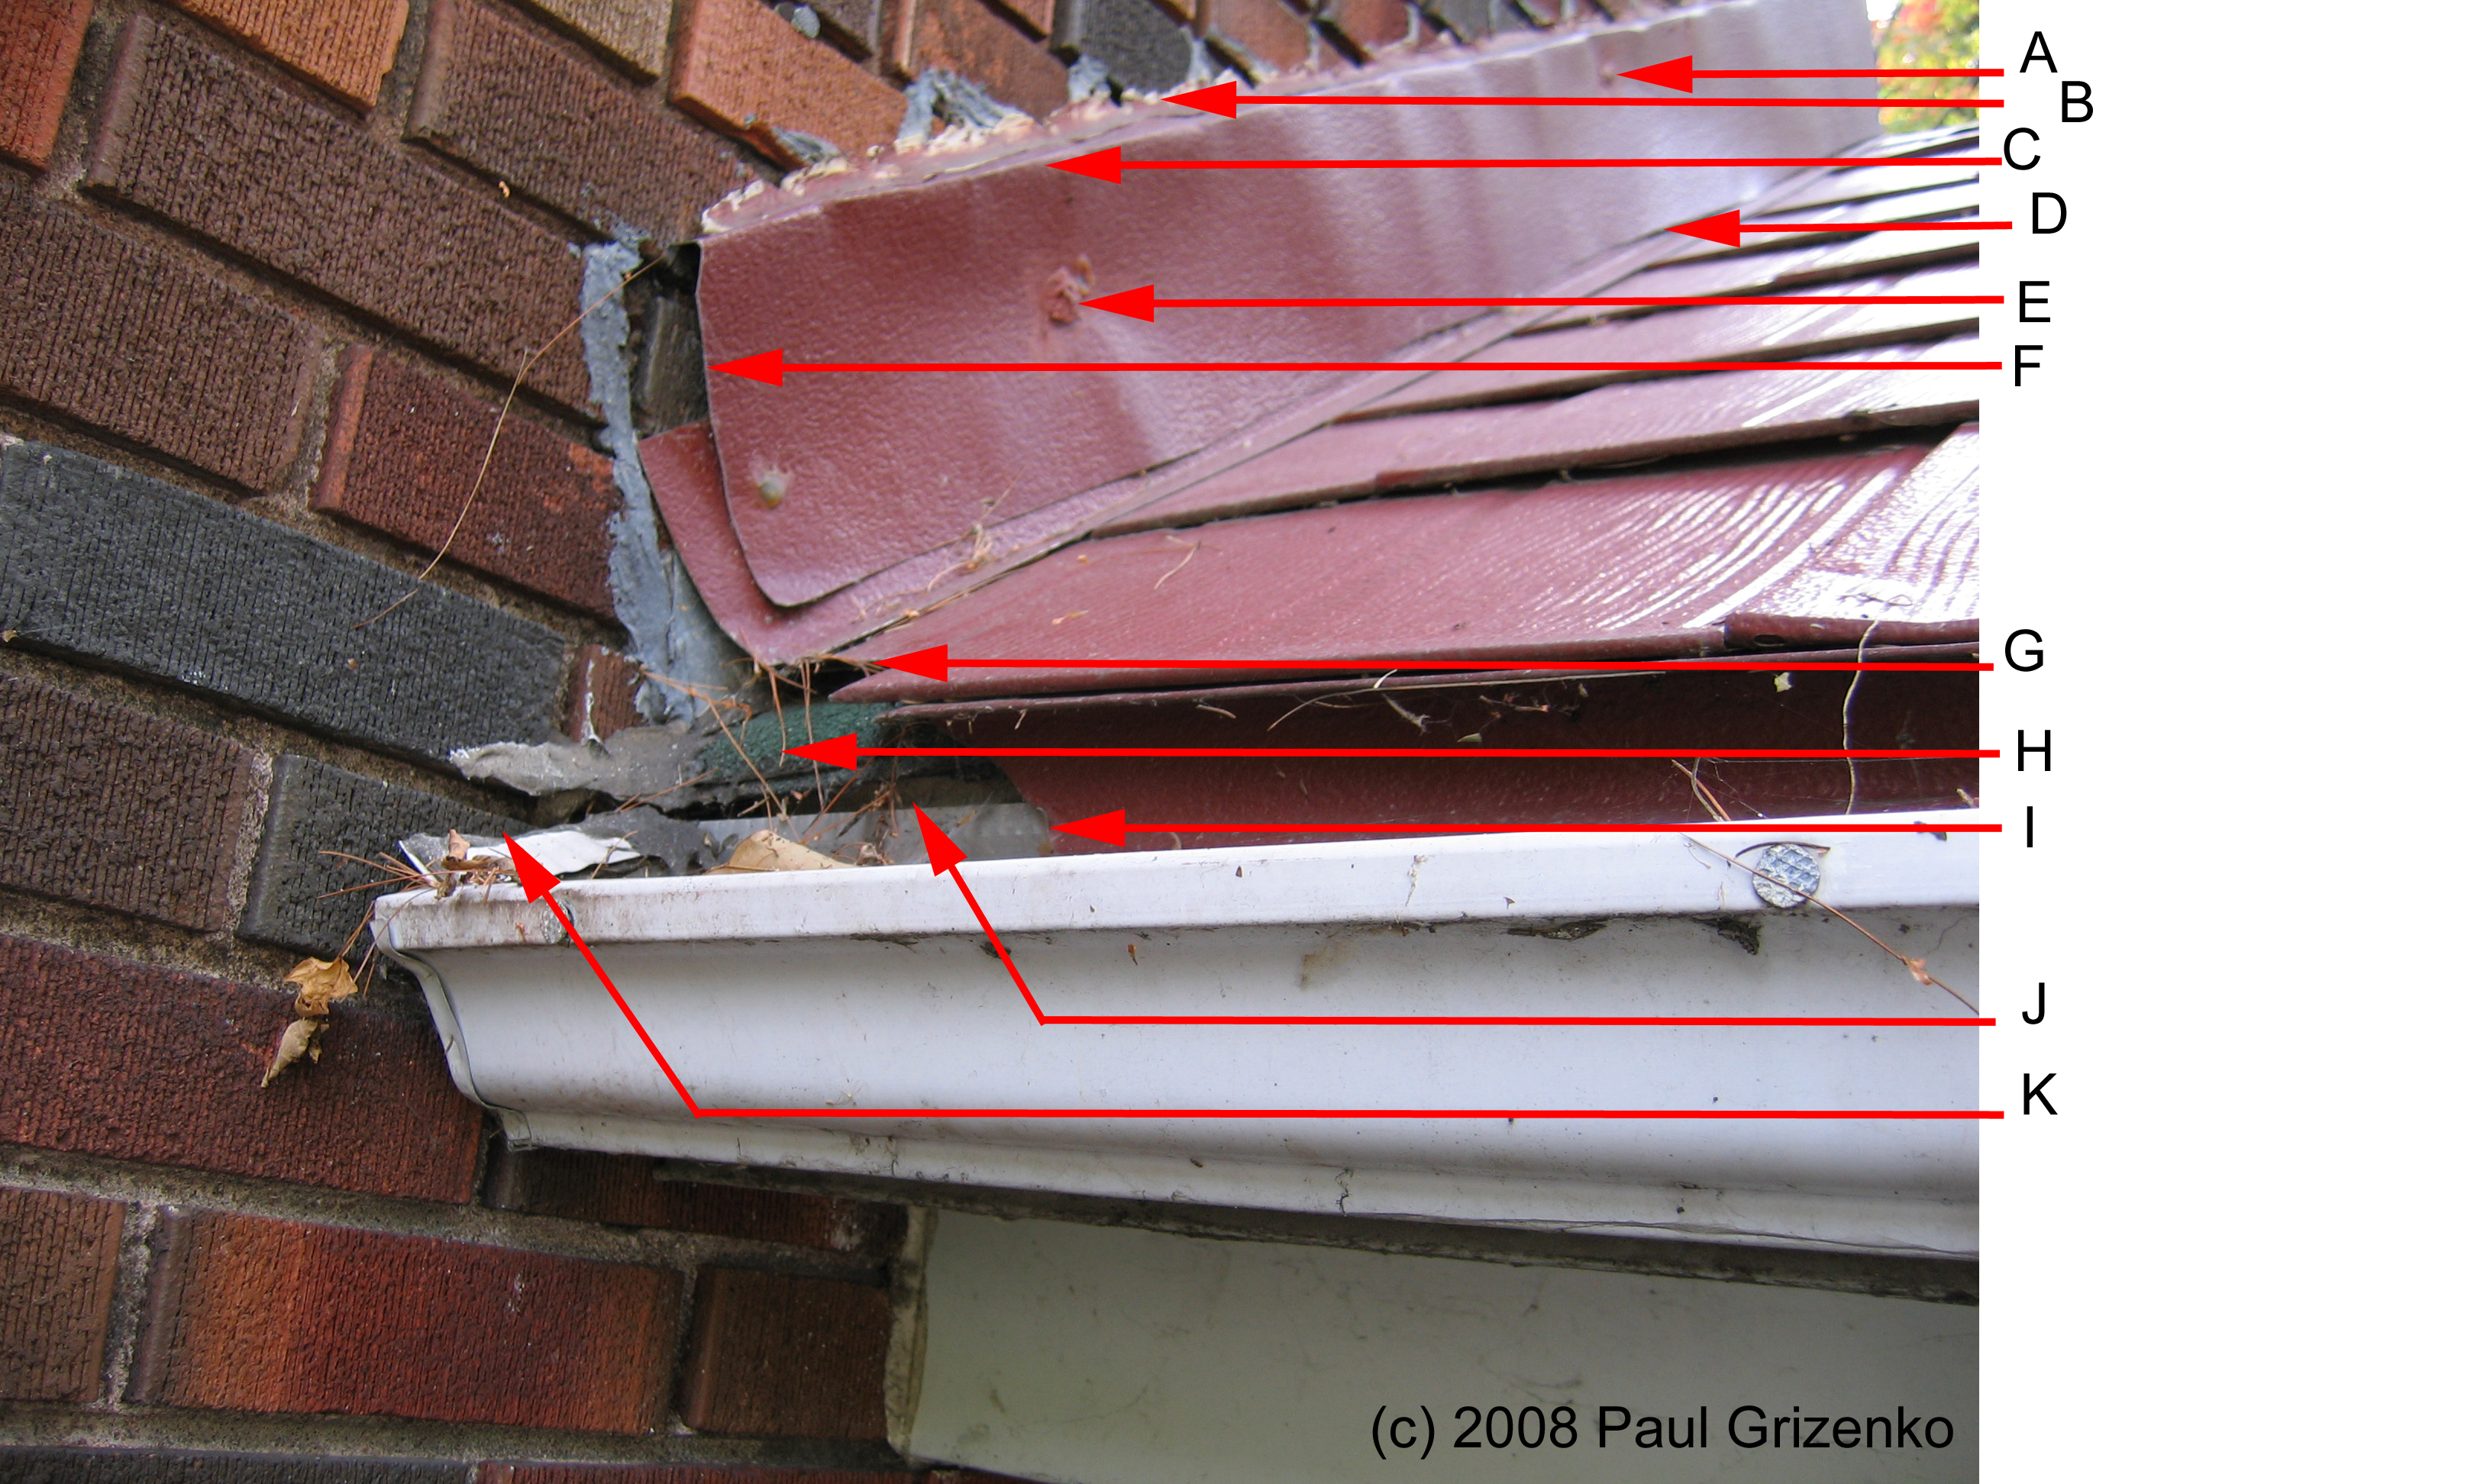
We were asked to diagnose a case of roofing materials being damaged by sliding snow and ice.  The covering materials were made from Interlock Finall aluminum shingles.  The company that carried out the installation was “no longer in business”.  While carrying out the inspection, I witnessed many elements that I considered substandard, and workmanship which was quite appalling.  The photograph documents one location where a number of deficiencies were found.

Example of poor detailing on an aluminum roof install.

Example of poor detailing on an aluminum roof install.

The area in the photograph is the lower part of a roof, adjoining a wall.  The correct approach would have been to do this part in the following manner:

  1. The sidewall flashing is removed.
  2. The old roof covering is removed.
  3. A base flashing (about 4”x4”) is installed the length of the roof-wall join, and waterproofed with roofing cement.
  4. Water-proofing membrane (ice-and-water-shield membrane or other peel-and-stick membrane) is installed along the roof/wall joint, running about 4” up the wall, and extending past the eve by about 1-2”.  To ensure adhesion to the metal base flashing and the brick, the area is first primed with roofing cement.
  5. A width of water-proofing membrane is installed along the eave, with about 1-2” of membrane extending past the eave, to protect the upper portion of the fascia board.  The membrane is 36” wide, so the eave is covered by membrane along the eave to a height of about 34-35”.
  6. The rest of the roof surface is covered by synthetic underlayment, to provide cover for the roof until the covering is installed, and to provide a water-proof barrier to any condensation that will occur under the metal surface after installation.
  7. A starter flashing is installed along the base of the eave, to provide an attachment point for the shingles, and to ensure water cannot enter the roof system.  If there is a gutter, the membrane need to be BEHIND the gutter (ie, between the gutter and the fascia board), and the fascia portion of the starter flashing should be OUTSIDE the inner gutter wall, so the water is directed into the gutter.
  8. A side-wall or end-wall flashing is installed along the roof-wall to a) provide a solid attachment point for the shingles, b) to prevent water entry, c) provide a drainage path for any water entering the join at that point, and d) to create an esthetically-pleasing transition detail between the roof and the wall.  The vertical height of the flashing is usually determined by the amount of expected snow accumulation, with the top being ideally at least an inch or two above the expected snow height.
  9. At the join of the endwall flashing to the starter flashing, the endwall flashing is placed OVER the starter flashing so that any water carried by the endwall flashing is directed to the outside.
  10. The shingles are installed, locking into both the starter flashing and the end-wall flashing.
  11. A wall counter-flashing is installed over the top of the end-wall flashing, to ensure that the wall-flashing join is protected from the sun, wind and water.  Depending on the wall material, the counter flashing is positioned into a cut (if brick), or is custom-fitted to follow the contours of the brick or other material.

This photograph documents that many of these steps have not been done.

Step 1 (remove old flashings) – was done.  This can be seen by the residual caulking (greyish in colour) that was left on the brick.  Note that the original counterflashing was fitted to follow the brick grouting.

Step 2 (remove old roof covering) – not done.  We can see the old roof covering (green asphalt shingles) peeking through at “H”.

Step 3 (install base flashing along wall) – not done.  We should have seen the base flashing at the corner of the roof/wall at “H” if it was there.

Step 4 (install waterproofing membrane along roof/wall join) – not done.

Step 5 (protect eave with waterproofing membrane) – not done.

Step 6 (install underlayment) – unknown.

Step 7 (install starter flashing along eave) – done, but poor finishing detail.  The flashing should have extended to the wall, but instead it was cut short leaving the roof/wall/fascia corner completely unprotected (“I”).

Step 8 (install endwall flashing) – done, but poorly.  The endwall flashing (running up the wall under the counterflashing), is cut short at the base (see “G”), and does not overlay the starter flashing.  It also does not go up the wall high enough to prevent water entry if water-saturated snow has accumulated on that roof section, and the flashing itself does not appear to have a internal safety bend that would keep the water in a channel.

Step 9 (lap endwall flashing OVER starter flashing) – not done.

Step 10 (install shingles) – done.

Step 11 (install counterflashing along wall) – done but poor workmanship and detailing.  There was no attempt to “marry” the flashing to the brick.  The counter-flashing was poorly bent (see “C” – edge of bent is not crisp and straight, so it appears this was done by hand), the flashing was effectively glued to the wall with caulking (see “B”), with two fasteners holding it to the wall (see “A” and “E”) causing buckling (see “D”).  The counter flashing should have extended past the end-wall flashing at the eave, but was terminated much earlier (see “F”).

Because of the many short-cuts taken, water entering the gutter can go and enter the fascia board at “J”.  It can be also seen that the gutter is loaded with ice in winter, and has been deflected downwards (see the break in the old caulking at “K”).

The point of this analysis is to show that the pesky little time-consuming details matter in giving a good end-result.  Giving the illusion (appearance) of having metal installed without paying close attention to the details, is not sufficient when protecting the roof and related structures against the elements.

(c) 2014 Paul Grizenko