The last time you had your roof done, you wanted to be sure that the leaks you had before would never happen again, and you made sure that your roofer installed waterproofing membrane to protect your roof. Now it’s winter, and you’re having some leakage issues. WHY?
Let’s start by examining what are waterproofing membranes, and how are they should be used.
There are a number of products that are marketed as waterproofing membranes for sloped roofs. There are different grades, performances and price-points. For the membranes to work properly, they need to be properly installed, under the right conditions, at the right place(s) and for the right purpose. As is true for all building materials, they have both strengths and weaknesses, which must be taken into account by the installers. From their method of application, they are also known as “peel-and-stick” membranes.
In general the membranes work by bonding (melting into) the wood decking, and thereby providing a waterproofing bitumen layer which keeps the water out. The membranes bond well to each other, and to wood (provided it is dry and warm enough). When pierced by a fastener such as a nail, the material acts as a gasket around the nail and resists water penetration. Therefore, if the membrane is applied to the right place, in the correct way, at the right temperature, and to the right materials, it works.
Membranes, however, sometimes fail. It is useful to know the different ways failure can happen.
- The membrane was not installed over dry, solid wood. This meant that the membrane could not bond to the wood, and thereby establish a waterproofing layer.
- The membrane was installed over non-wood materials. This is a common failure, found when the installer did not properly prime the non-wood surface to ensure both adhesion of the membrane and the creation of a waterproof seal.
- The membrane was not overlapped sufficiently. Each membrane has a minimum overlap requirement, and the installers MUST ensure that the bond between successive layers is active. This kind of failure also happens if the membrane was laid vertically when it should have been laid horizontally. The vertical joints are more susceptible to leakage.
- The membrane was cut flush with the edge of the roof. This is a common installation failure, which allows the water that may be on the surface of the membrane to enter the decking at the edge of the roof. Proper installation practice is to run the membrane past the roof edges by at least 1-2 inches to ensure the water stays outside the roof system.
- The membrane was installed over damaged wood or on a joint. Fasteners piercing the membrane at those points will not have the solid wood support that ensures the dimensional stability of the puncture point, and therefore, water will enter the roof system through the nail holes in those locations.
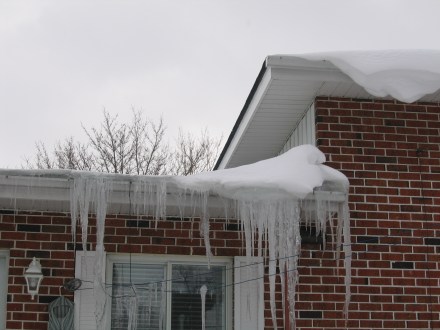
- The membrane was installed over a non-ventilated space. This may become a very serious issue if the space is NOT sealed, and may contain moisture or water vapour. This is known as “trapping” the moisture, and will lead to both wood rot and mold (potentially toxic) in the spaces.
- The membrane cracked or torn, letting in water. This can happen if the membrane was left exposed to the sun for longer than the manufacturer recommended, or if there was movement in the structure that put tension on the membrane. This can also happen more easily with cheaper membranes.
- The wrong kind of primer was used, leading the materials to “melt” the membrane, instead of providing a suitable attachment point.
There are, of course, many more ways the membranes can fail to work, but as can be seen above, if a membrane doesn’t work, it’s almost always because the installer failed to do the installation properly. Proper application of the membrane takes time, and ensuring that the overlaps are all properly sealed, and that the junctions to various roof penetrations are properly primed and joined, is detail work that cannot be rushed. As well, as in painting, if the proper preparation is not done, then the adhesion of the waterproofing layer is going to be compromised.
In our experience, the failure of the waterproofing layers is a very common reason for replacing a roof prematurely. Unfortunately, once the roof covering is on, it’s impossible to verify whether this critical element was properly installed. In practice, if the cause of a roofing failure is suspected to be linked to the membrane, it is often necessary to disassemble the roof system and to do an “autopsy” to determine the cause of the failure.
So, how do you ensure that the waterproofing step is properly done? There are a number of steps that help you get to the desired result.
- Check the products that will be used. Get the brand names, the product names, and the installation specifications. Read carefully the parts about what NOT to do. Make sure that the manufacturer’s suggested use covers what you want to use it for.
- If you’re having someone else install the products (your roofer, for instance), ask them to explain where they would use the products, what kind of preparation they will do, what kind of verification or quality control they will do to ensure the materials will work as intended. Ideally, they should be able to show photographs of prior installations where they did the membrane application. Probably more important, is asking them under which circumstances the products did NOT work, and what they would do if those circumstances were found on your roof.
- Once the installation starts, you need to check how the material is being installed. How well was the roof preparation carried out? Are the non-wood surfaces being primed with the appropriate primer? How are the overlaps sealed? Is the edge of the roof being overlapped? Imagine water running on the surface. Where will it go? Is there a chance for obstruction? Is there any apparent damage to the material during the course of installation?
- Once the installation is complete, but before the covering or flashing is put over the membrane, the surface needs to be verified as to its adhesion, overlap, and coverage. It is a good idea to request (in the contract) that photographs be taken of all roof penetrations, roof joins (such as valleys, endwalls, sidewalls), and roof terminations (rake or gable end, eave, hip, ridge) to show how those details were executed. Alternatively, hiring a third party to conduct an inspection at this stage is another way to ensure that this critical step in the process is properly done.
- Occasionally, especially with complicated roof lines and assemblies, it is appropriate to conduct a water test to ensure that there are no weak spots in the water-proofing coverage.
- If membrane will be installed over the entire roof, it is really, really important to ensure that EITHER the roof system below the membrane is sealed and impermeable to water vapour, OR that it is well vented, so that any moisture trapped under the membrane can escape. If a roofer or contractor agrees to install the membrane over the entire roof without make sure that either condition exists to a satisfactory level, they are being at best ignorant, and at worst, willfully negligent.
Of course, the membrane protection is only part of a well-constructed roof system. Good installers will build in several layers of over-lapping protection to ensure that there is no single point of weakness that can undermine the efforts put into building the roof system. If you’re not sure what needs to be done with your roof, give us a call. We can give you an intelligent analysis of what issues are important in your situation, and what you need to do to make sure your system works.
(c) 2013 Paul Grizenko
Links:
Below are two membranes that we use routinely, and that have been, in our experience, proven to work well, provided they are used correctly.
Grace Ice and Water Shield Membrane: http://www.sg.graceconstruction.com/custom/underlayments/downloads/guide.pdf
Interwrap – Titanium PSU membrane: http://www.interwrap.com/downloads/roofing-docs/TITANIUM_PSU-30_BROCHURE.pdf
Further information:
If you are interested in knowing more, use the contact form (under the Contact Us menu selection), or give us a call at 514-636-2300.