
There are several aspects to maintenance. Preventive activities look for possible weaknesses and starting signs of deterioration. Remedial activities repair or remediate things that started to fail. Replacement activities are appropriate when incremental repairs don’t do the job any more. Some of these activities can be easily done by the homeowners, others should be done by professionals. Let’s have a look at this in more detail.
Month: December 2013
Ice Dams – Cures, fixes and band-aids.
You have a nice ice dam, or maybe even several. The overflow is producing big, picturesque icicles on the outside, and leakage on the inside. If you’re unlucky, the ceiling is showing signs of falling in under the water infiltration. What to do?
There are actions you can take now, and then there are various methods of preventing the issue, or finding acceptable ways to live with it. Keep in mind that the nature of the ice dam changes depending on the slope, the roof-line complexity, the roof covering material, and the prevailing climate conditions. Therefore, the discussion below may, or may not address your specific situation.
The first order of business is to assess whether the ice dam is causing (or is about to cause) damage. The damage that can get caused includes leakage into the house, overloading the gutters, and forming potentially dangerous icicles. Leakage can range from a slow leak, to a massive entry of water.
A. Immediate Action
Obviously, the first thing to do is to get rid of the water accumulating behind the dam, and then remove the dam because more water will accumulated after if allowed. How you go about this depends on the type of roof cover you have. If it’s asphalt shingles, you have to be careful not to damage the shingles when you remove the ice.
1. Asphalt roofs
Asphalt roofs are designed to shed water. They are not waterproof. To render at least the edges of the roof able to withstand water infiltration, the common solution is to use ice-and-water shield membrane along the eaves to provide a waterproof layer. When roofs leak even with this layer in place, it is usually because not enough of the right membrane was used, it was applied incorrectly, and the installers did not verify the seal of the membrane.
Safety is the first concern on any de-icing operation. If your roof is walkable and only one story high (bungalow, ranch-style), then it is easy to get up onto the roof. If it is steep or high, then this is better done by people who have the equipment to do this safely.
Having made sure that you (or your hired help) are safe and properly secured against a fall, it’s probably best to first remove the snow above the ice dam, as this is the “fuel” which will continue to add to the ice dam if allowed. In doing so, remove the snow down to about 1-2 inches of the roof. Removing more of the snow, down to the shingles themselves risks damaging the shingles. We use plastic shovels for this purpose to prevent damaging the roof covering in case the shovel does make contact with the roof.
If there is substantial amount of water behind the ice dam, use a plastic pail or bailer to scoop it out, to reduce the amount of water pressure that is being put on the roof system.
How you get rid of the ice depends on how thick it is. In the worse case we’ve seen, the ice dam was over 1 ft. thick and the water was about 8” deep. On that one, we bailed the water, then we used hatchets until we were within several inches of the roof covering. The last few inches of ice we broke up using hammer blows until we got to the roof covering.
If the situation is not so urgent, you can put de-icing solution on the lower part of the ice dam so that the base of the dam is weakened. (NEVER put the salt or de-icing solution above the ice dam, as all that will do is make the water that’s accumulating behind the dam even more of a mess, now adding salt and other chemicals to the leakage.) Once the ice is weakened, then hatchets (used down to several inches of the roof) and hammer blows can break up the ice.
We have seen people try to use hot water, or heating cables, or even propane torches to try and melt the ice dams. Heat can work, as long as it is applied at the base of the ice dam, and not above the ice dam. Keep in mind, that if you haven’t removed the water first, and you breach the ice dam, then you will get a large gush of icy water rushing out of its new opening. If you happened to be doing this standing on a ladder and working on the ice in front of you… you’re probably now going inside for a change of clothing.
A further issue is what to do with the gutters that are filled with ice, and may have contributed to the formation of the ice dam. This needs to be assessed on an individual basis, depending on how strong the gutters are, how solidly they are attached, and what kind of material they are made from.
2. Tar and gravel roof
Tar and gravel roofs generally have a slope of 2:12 or less, and are designed to either allow the water to run off over an eave, or to a drain (or several) located somewhere in the interior space of the roof. The roof surface is designed to be completely waterproof, and generally there is no need to break up the ice dam, unless the central drainage hole is plugged up and the water cannot drain. If you DO have this situation, then it’s best to call in professional roofers, who will first remove as much water as possible, and then will try to clear the blockage. If not done properly, there is the danger that the seals around the drain will be broken, or that the roof covering will be damaged. In either case, you will have turned a “potential” problem into an actual emergency.
3. Membrane roof.
Membrane roofs are an alternative to tar and gravel roof, and usually are found on slopes of 3:12 or less. They are quite delicate, and are not designed to put up with any traffic on the surface. Membrane roofs should be de-iced only by professional roofing companies that install this kind of product. However, as with tar and gravel roofs, it is usually not necessary to get rid of the ice dams, as the covering (if properly installed) is designed to be water-tight.
4. Other kinds of roofs
There are many kinds of materials used for roof covering, such as metal, aluminum, zinc, cedar shakes, clay tile, concrete tile, fiberglass panels, slate, and so on. The ice-dam removal strategy changes with the type of roof covering, and with the underlying structure of the roof system. It is usually best to refer this issue to companies that specialize in installing the type of roof covering you have, as they will know the potential dangers and weaknesses of this type of roof covering.
B. Short-term preventive
Of course, the better strategy is to prevent a problem. Assuming you have not fixed the underlying issues of insulation and ventilation (more on that in a later section), you can at least approach the problem with the goal of minimizing the problems that an ice dam can cause.
1. Remove the snow
The simplest strategy is to remove the snow from the roof before it can melt and create an ice dam. If the roof is not too high and not too steep, it is possible to do this using snow rakes (plastic scoops at the end of a very long aluminum pole), or getting onto the roof and using plastic snow shovels. Of course, you need to do it immediately after each snow fall, because the melting/freezing starts as soon as there is some snow on the roof.
2. Install de-icing cables
If the roof area is too dangerous to go onto, or too high, then removing the snow becomes impossible, and the second strategy can be used, which is to use de-icing cables or heating tape to melt channels into the forming ice dam. This has to be done ahead of time, before the snow season starts. This method CAN work, IF done properly. However, most installations of de-icing cables do not accomplish their job and end up contributing to the problem. So what are some of the common failures?
- The gutters are not included in the de-icing strategy. The meltwater then runs into the gutter, freezes, and backs up. The cables need to be placed along the gutter, and down the downspouts.
- The cables are placed horizontally and not vertically. The point of melting channels in the snow is to allow the water to use these channels to run off the roof. Therefore, they should be arranged more vertically than horizontally. As well the cables should go into the gutter, to intersect the cables running along the gutter base – this way the water has an open channel to escape.
- The cables are place too low, and the ice dam forms above the cables.
- The cables are placed too far apart, and the space in between forms many small ice dams.
- The cables are not secured properly, and snow movement causes them to come off the roof.
When using de-icing cables, you need to arrange them to provide for a water flow path from above the point where the ice dam can form, all the way down to the gutter, and down the downspout. De-icing cables work, but they are an expensive band-aid.
C. Fixing the causes
The best way to deal with ice dams is to make sure they don’t form in the first place. If you’ve read the article “What’s an ‘Ice Dam’?”, you’ll know that the primary issue is that there is insufficient insulation which therefore allows heat loss to the attic, and with insufficient ventilation, the warm attic then melts the snow that accumulates on the roof. The meltwater runs down the slope to the eaves, and once it is over the roof above the soffits, there is no more warmth to keep the water liquid, and it freezes. To fix the problem at its source, you need to address both the insulation and the ventilation issues.
1. Insulation
How much insulation is “good enough”? The building code minimum depends on many factors, but the general recommendation is to have attic insulation between R40 and R60. In our own work, we have observed that roofs with real insulation value of R30 or less almost always have serious ice damming issues. Roofs with real insulation value of R40 or more almost never have ice dams.
Notice I wrote “real” insulation value. The insulating value of various materials depends primarily on how much air they can hold without movement. Still air is an excellent insulator. Moving air, however, is not. Therefore, to get the maximum value of insulation from any insulating material, it must be installed in a way that prevents movement of air through it. It is not uncommon to find lots of insulation in an attic, but arranged in such a way that the effective value is less than half of what it should have been.
The insulation value also depends on the insulation being dry. Wet insulation has effectively no insulating value. Therefore, if one has had leaks in an attic due to ice dams, and those leaks soaked the insulation underneath, then the attic has even less ability to prevent heat transfer – enabling more heat to escape and melt more snow – a vicious cycle.
One very common source of heat in the attic, is the use of poorly installed and insulated pot lights or ceiling lights. The boxes containing these lights are normally placed above the ceiling and displace a portion of the insulation that would have normally been there. These lights generate a lot of heat, which then easily escapes into the attic (due to minimal insulation) where it is then transferred to the roof.
Different materials have differing insulating values. To get R40+ insulation using fiberglass bats, would take about 13 inches if they were well installed with no air gaps between them, and no possibility of air movement through them. If, the same bats were poorly installed, you’d need at least 26 inches to get R40. The same R40 requirement can be achieved by 6” of polyurethane closed-cell foam. Therefore in some areas of the attic where space is limited, it is worth thinking of mixing different types of insulation to achieve the goal of having at least R40 in the attic.
2. Ventilation
Once the heat enters the attic, whether due to poor insulation or other cause, it will warm the air in the attic, which then rises to the roof decking, and warms the roof. The effects of poor insulation can, to a certain extent, be reduced by good ventilation – that is, the movement of air from the soffits along the eaves to the outlets located near the top of the roof at the ridge. In practice, we have observed that good ventilation reduces the effect of poor insulation, but does not completely prevent the heat transfer. In addition, due to the complexities of construction of many homes, the ventilation air flow is not very linear and consistent, with many spaces that have no effective ventilation.
For passive ventilation to exist, it needs to enter the attic at a low point (typically the soffits), move through an air channel (minimum 2” according to the building code) into the attic, from where it exits through a ventilation outlet located hopefully near the top of the structure.
Some of the reasons why ventilation is NOT working include:
- Blocked soffits (vented soffits installed over solid wood, vent holes in soffits covered by paint, insulation blown into the soffit cavities, etc.)
- Insufficient air channel (insulation is too close to the roof to allow easy air entry from the soffit cavity into the attic).
- Poor location of both intake and outflow vents, creating ventilation short-circuits,
- Poor balancing of intake and outflow – too much or too little outlet or intake.
- Internal attic obstructions that prevent the movement of air.
It is not enough to place a number of outlet vents and consider the ventilation issue to be “solved”. There is a science behind this, and the amount of ventilation required can be calculated quite easily, if you know what you are doing.
D. Preventing damage
If you cannot fix the problem at its source (namely by improving the insulation and the ventilation), then there are other things that you can do so that the ice dams don’t cause serious damage.
1. Ice-and-water shield membrane
The most common solution is to install a width of ice-and-water shield membrane along the eaves, the valleys, the endwalls, and all other places where it can be expected that water from ice-dams could penetrate the roof covering. For this protection to be effective, the right product needs to be installed in the right way, at the right time, and at the right place. In another post (Dec. 8, 2013), I discussed some of these issues.
Ice-and-water shield membrane needs to be installed at the time the roof is being constructed, or at the time of re-roof. It needs to be installed high enough up the slope to ensure that the worst ice dam will not breach the defenses. It needs to be applied directly to wood, so that it can bond with the wood. It needs to be properly overlapped to ensure proper sealing of membrane-membrane joints, and be properly primed if the membrane is contacting surfaces like metal or brick. There are a few more “needs to” or “should” instructions, but it is clear that if not properly installed, the ‘miracle’ stuff won’t work when you really need it to work. And yet,when we are asked to diagnose a roof failure this is where we find a large number of short-cuts taken .
2. Ice belts
Ice belts are horizontal bands of smooth metal that are installed along the eaves (usually over the soffit cavities) to allow snow at the roof edges to slide off, and thereby removing one factor that can help the formation of the ice dam. They work, kinda. The real problem is that often times the belts are not high enough to ensure that no snow sticks to the roof and contributes to the ice dam formation, and under certain climatic conditions, the ice belt doesn’t prevent the snow from sticking to the roof. However, being made of continuous metal with few joints, there is much less chance for water to enter through one of the joints.
Using an ice belt is a good way to reduce the chance of ice dams, but it doesn’t prevent them. Again, an effective ice belt requires proper installation, proper waterproofing, and proper protection of the roof deck below the metal.
3. Smooth metal roofs
Expanding on the idea of the ice belts, you can cover the entire roof with a smooth metal (in the form of panels or shingles), which will allow the snow to slide off the roof. This is one reason why historically most roofs in the heavy snow regions usually have some kind of metal covering. So why not install metal roofs everywhere? There are several reasons why:
- Metal roofs typically cost anywhere from double to as much as four times more than the common asphalt roofs.
- Smooth metal roofs do shed the snow, but not always when you want the snow gone. Under some circumstances the snow may stick to the roof, accumulate, and form a thick ice crust at the base of the snow, before finally conditions change and the entire mass avalanches off the roof slope. Depending on where it ends up landing, you could have some serious damage or injury. Therefore, smooth metal roofs need to be designed to allow snow descent in the right areas, and prevented from doing so in areas where injury or damage can be anticipated. Not all contractors worry about these kind of niceties.
- Smooth metals roofs have their own esthetic appearance. Some love it, some don’t.
- Metal roofs usually require a different level of expertise to install properly, compared to asphalt roofs. These skills are not common, and are usually specific to the type and brand of material being installed. Therefore finding good installers is somewhat more challenging.
- Not every metal product is appropriate for every situation. It requires some expertise to ensure that the strong points of a particular product are fully utilized for a specific installation, and that the corresponding weaknesses (and all products have weaknesses of one kind or another) have been adequately covered.
Metal roofs are an excellent roof covering, but they don’t make the ice dam problem go away. There are many fewer opportunities for ice dams to form on a metal roof, but they still can happen. And when they do happen, the other protective measures need to be in place.
E. What NOT to do!
Having seen many attempts at removing ice dams, there are a few words of wisdom that come from such observations:
- DO NOT put your de-icing solution on the snow or ice above the ice dam. This will just enlarge the pool of water , and cause the water entering to be carrying the salt or chemical in the de-icing solution. This can be very difficult to clean up after the ice dam is long gone.
- DO NOT get on a ladder and start chopping away. If the ice dam breaches, you will be on the receiving end of a lot of water, ice chunks and other stuff.
- DO NOT try to do the de-icing by yourself. This is pretty energetic work, and if you’re not used to this level of exertion, bad things can happen to your heart. If something happens, who will find you, and when? In addition, a ladder in the snow is not the most stable platform. If you want to do the de-icing yourself, at least have someone at the bottom making sure that the ladder doesn’t move.
- DO NOT try to work on the roof without using proper fall protection. The falls aren’t the problem, it’s the rapid stop at the end. Or, if you just tied a rope around your waist, you’ve created a situation where your spinal cord can be broken if you fall. An ice dam is not worth becoming a paraplegic over.
- DO NOT try to remove all the ice dam – some of the ice is between the shingles, and removing that little final coat of ice will also remove some of the shingles that are encased in that ice.
There are probably quite a few more that could be added to this list, but the point is – if you’re going to do either de-icing, or snow removal, do so in an intelligent, well-thought-out way, using the safe methods and the right tools. Because your life may depend on it. Or, hire people who know what they are doing. Like us.
(c) 2013 Paul Grizenko
F. Links:
CMHC article on insulating your home: http://www.cmhc-schl.gc.ca/en/co/grho/grho_010.cfm
Jon Eakes article on insulation levels: http://joneakes.com/jons-fixit-database/793-WHAT-ARE-THE-RECOMMENDED-INSULATION-LEVELS
Definition of R-value: http://en.wikipedia.org/wiki/R-value_(insulation)
Natural Resources Canada publication: 2012 Energy Start for New Homes Standard: http://publications.gc.ca/collections/collection_2012/rncan-nrcan/M144-237-2012-eng.pdf
G. Request for feedback
If you have found this information useful, let me know via a comment. If you found the information inaccurate or misleading or simply not correct, please contact me to let me know why you think so. If you have experienced an ice dam and had it resolved, how did you do it? I’d love to read your comments.
Skylight leaks – no, they don’t have to.
The skylight is a wonderful enhancement for homes, bringing in natural light to dark areas, and increasing the feeling of “openness” in a house. However, skylights also have a bad reputation due to problems of leaks and condensation. Fortunately, if the skylight is of good quality and is properly installed, then you should have all the benefits without suffering the usual problems. This post discusses some of the issues in preventing problems with skylights on steep roofs.
Why do skylights have a bad reputation for leakage? It’s probably due to the fact that the roof and the skylight were installed by different people, and the demarcation line between the two is rarely clearly indicated. That means that one or the other probably didn’t take all the possibilities into account when doing the installation and waterproofing.

How a skylight fits in a roof.
For a skylight to work effectively, without causing condensation or leakage, the light well must be sealed with a vapour barrier, and insulated at least to the same level as the ceiling. Then, the dew point will be located in the insulation, and will not contribute to condensation moisture.
The pink area shows the presence of the interior air which is warm and humid. The cyan area represents the cold attic (and wall cavity) air.
The key elements in keeping the skylight (#3) from causing condensation problems are shown below:
1. Vapour barrier which prevents moisture from internal air from leaking into the cold spaces.
2. Insulation appropriate to the climate zone, which is of sufficient thickness and effectiveness to keep the dew point inside the insulation.
3. The skylight itself should be at least double-paned, with a sealed interior space to prevent condensation within the skylight.
4. Outside curb wood
5. Insulation between inside and outside curb structure.
6. Inside curb wood.
If your skylight well is properly insulated and has a good vapour barrier, then condensation should not form inside the well itself.
Once the skylight is mounted on the roof, it has to be well sealed. An example of appropriate installation methods is shown at the Velux web-site (here: http://www.velux.ca/en/professionals/installation_and_training/installation_help/installatin_instructions). The waterproofing consists of a good application of membrane (Grace I&W Shield or equivalent) around the entire curb box of the skylight, with field-formed flashings sealing and protecting the membrane. Then the skylight flashing kit is usually used on the outside to complete the installation.
If a skylight is installed after the roof is already in place, then ensuring that enough waterproofing is installed becomes a key concern. As mentioned in other articles and blog posts, membrane has to be installed in a correct manner for it to work. That includes priming non-wood places and/or where the membrane may not bond directly to wood. There must be proper overlap between membrane layers, and the membrane needs to be fully adhered to ensure water-tightness. Once the membrane is in place, custom flashings are usually field-formed to envelop the skylight curb and to protect the membrane. Then the skylight trim flashings get installed over this assembly.
Therefore, one common cause of skylight leakage is the failure of the flashings and/or waterproofing around the skylight curb. Another is the use of the incorrect flashing for the roof type you may have.
Skylights sometimes also fail because the seals that are installed at the factory, become dislodged, dry out, or shrink, causing a place where water can enter. If this is the case, it is usually most prudent to replace the skylight unit.
Since skylights form a rather large obstruction to water/snow/ice flow on a roof, it also happens that a local ice dam forms at the top of the skylight, and if the waterproofing was not run far enough both up and laterally, you can get leaks.
If you have a “leaking” skylight, the first thing to investigate is whether the leakage is condensation. Once that has been ruled out, then the seals around the skylight glass need to be checked. After that, it is the exterior waterproofing that is looked at. However, the latter is possible only when the roof is dry and not covered by snow or ice, as the flashing covers of the skylight have to be removed to see the exact condition of the waterproofing and the flashings. If you’re not sure what’s going on, give us a call.
(c) 2013 Paul Grizenko
Roof Leaks – causes and fixes
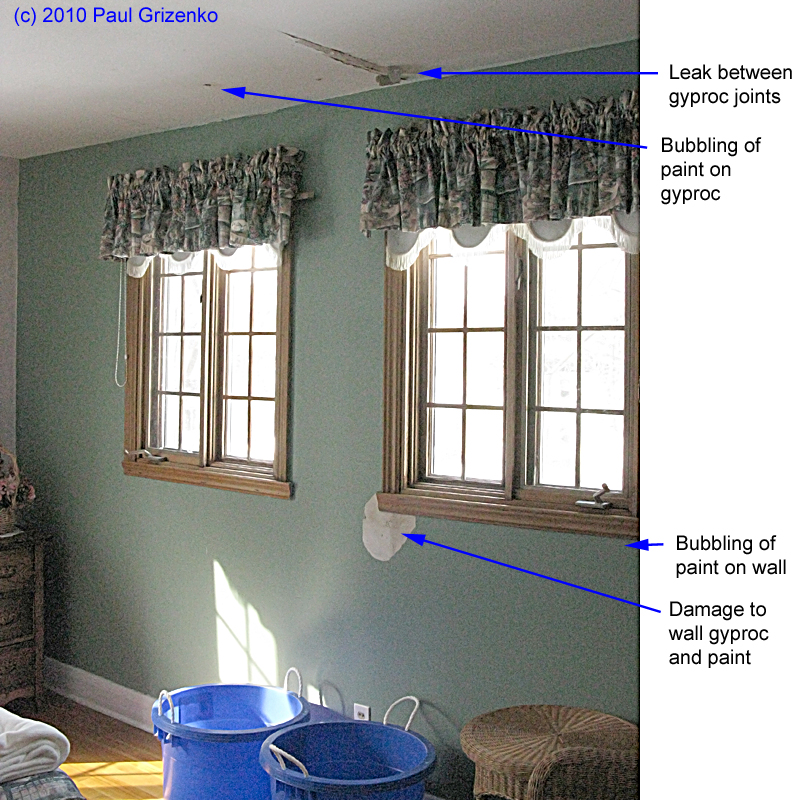
The most common symptom of a roof leak is bubbling paint or stains in the ceiling gyproc. Sometimes the leak appears at the ceiling/wall joint, sometimes it is becomes visible at the seam tape between the gyproc panels. At times, it is not subtle at all, with a large amount of water running down the walls or dripping onto your floors. Other times, the leaks are very subtle, and don’t show up as interior damage at all, but do let water into the attic or the cold spaces.
- Leakage from ice dam appears in several places.
The first thing to figure out is whether this problem is new, or whether it has happened before. If you’ve lived in the same home for more than a few years, and you’ve never seen it before, then chances are excellent that something changed recently, and therefore contributed to the leak. If you’ve been in the house for under two years, then it is possible that the former owner did not disclose the history of prior leaks, and therefore the leak you see for the first time, may in fact be a long-standing issue that was hidden by new gyproc and/or paint.
There are many possible causes of roof leaks. For “new” leaks, common causes are:
- ice dams
- gutter/eavestrough icing
- wind damage to roof cover
- failure of caulking or sealant
- physical damage to the roof surface by falling objects or ice
- failure of a waterproofing layer
- installation of a bathroom, kitchen or drier outlet into the attic
- Installation of pot lights or recessed ceiling lights
Other leaks, especially if they have been present for a while, are often caused by:
- poor installation of waterproofing layers
- poor design and/or installation of flashings
- use of inappropriate products to cover or waterproof the roof
- incorrect amount of ventilation and/or insulation for the roof design
- poor detailing of roof penetrations (air vents, plumbing vents, electrical poles, etc.)
- poor design of roof/wall flashings
- leaks in caulking at window and skylights
- poor placement of vents and other roof openings relative to wind direction
- condensation
If there were short-cuts taken during the installation of the last roof, then these usually contribute to making the original problem worse. For example, some roofers advocate leaving the old roof on because it gives “extra protection”. When a leak DOES happen, then the layers of old roofing provide an additional path for water to run in different directions. Other times, they “save you the cost of new flashings” and reinstall the old flashing – this works until the water finds the holes. Still other times, the various materials were not installed according to manufacturer directions, and therefore did not provide the appropriate waterproof seals that were expected (this is a common installation failure for waterproofing membranes).
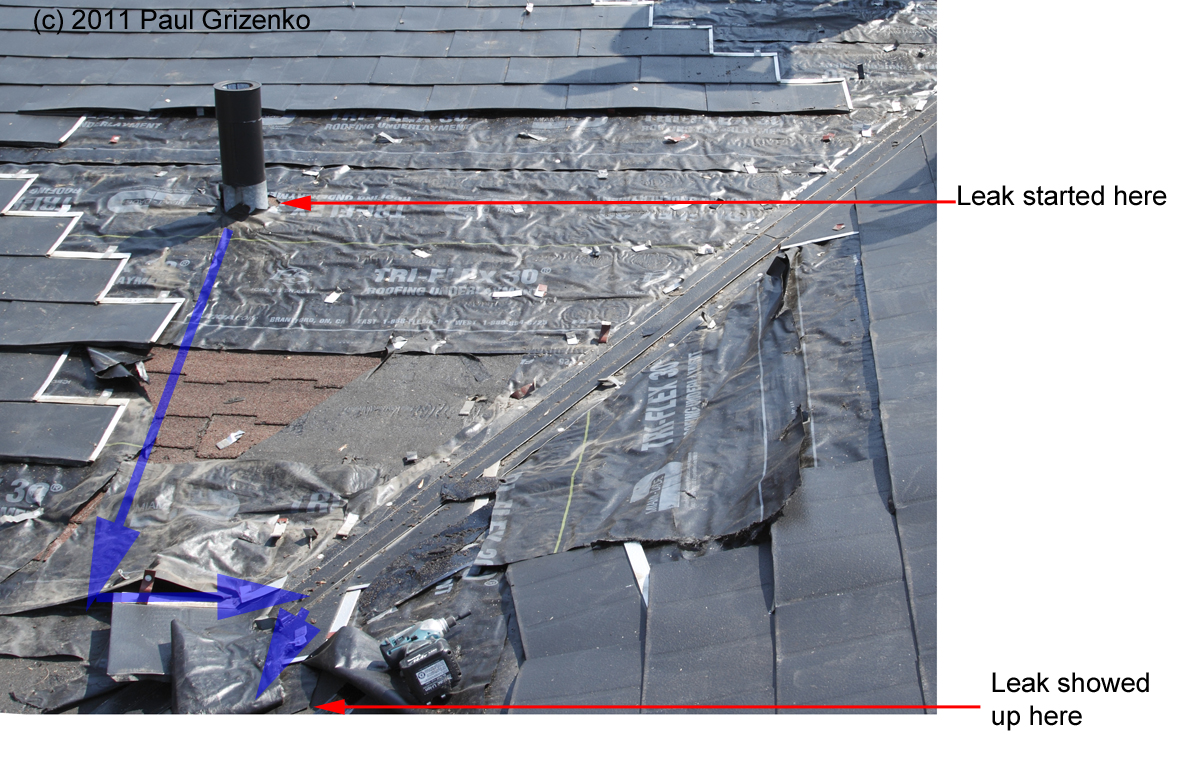
- Old shingles left on, contributed to channeling leak to different location
It is common to find that there is not a single point of failure, but a series of weaknesses that contributed to allowing the leak. For example: The primary cause is an ice dam, which allowed water to find a poorly-caulked joint, when then ran onto waterproofing membrane until it found an open seam, and then into the roof. Once it entered the roof, it ran on the underside of a beam until it came across a supporting strut, at which point the water dripped down onto the insulation, and through the insulation onto the vapour barrier. Then it pooled on the vapour barrier until there was enough to direct it to a gap in the vapour barrier, and onto the gyproc. It finally showed up as bubbling of paint on a gyproc seam. Where it came in can be quite far from where the leak actually occured. So when looking at a source of the leak, it is necessary to play detective, and follow the water trail. Sometimes it is quite easy. Usually, it is not.
In the above example, the solution (short-term), would be to remove the ice dam, and to dry out the accumulated water on top of the vapour barrier. However, the long-term solution is to add enough insulation to prevent the melting of snow in the first place, then have enough ventilation to remove any residual heat leaking past the ventilation and any moisture that may be entering the attic. When the roof gets redone, the membrane needs to be properly applied (right product, right installation method, right location), following by the appropriate flashings, and finally counterflashings and caulking.
In some cases, we’ve seen roof covering deteriorate to the point that water is freely running on the underlayment, and every gap in the underlayment allows entry of water through the nail-holes and other breaks in the underlayment surface. If the decking is made from OSB (Oriented Strand Board) of the Exposure 1 grade, then there is a high probability that the decking will be damaged extensively as well, and will need to be replaced. If the leakage has occured over a period of time longer than one year, then there are also mold issues to consider.
In short, a leak is telling you that there are potentially major issues to be dealt with. Before throwing money at the problem, take the time to figure out what’s actually going on, and what the priorities should be in terms of fixing the problems in both short and medium terms. If you contacted your last roofer and he claims that there’s no problem (that he’s responsible for fixing), maybe it’s time for a second opinion. After this, you will have a better idea of what the problems may be, and what would be a reasonable approach to getting them resolved.
(c) 2013 Paul Grizenko
To get the right answer, you need to ask the right question.
If you are a parent, you know that already. If you’re not yet a parent, well… you’ll find out.
The same applies when you’re interviewing someone for a job. You check the resumé, the credentials, the references, you ask the questions about work experience, ability to work alone or in a group, etc. Chances are, you know what the applicant needs to know and you can usually tell when someone is b/s-ing you. However, a good interviewing technique is to ask the right questions. And when you’re doing the interview for a position in your field, you know enough to know what the right questions are.
Now, you’re about to look for someone to put a new roof on your home, or perhaps to carry out the repairs. You’re also going to be conducting interviews, but now, the chances are excellent that roofing is not your area of expertise. In fact, the problem usually is that you don’t know what you don’t know. So how will you be able to ask the right questions?
There are usually two ways of approaching this lack of knowledge. One way is to educate yourself, by talking to neighbours and friends, by reading up on the subject, and by poking around on your roof and in your attic to try to understand what is going on there. This approach will, at a minimum, give you a basic vocabulary, and an idea of how things work. You still don’t have a lot of experience to guide your ideas of what is truly important and what is not, but you’re building up a base of knowledge.
The other way, is to rely on the good-will and the honesty of the contractors you will invite to quote on your project. If you are lucky, one or maybe even all, will conduct an inspection, and give you a written quote. If you are really, really lucky, you may be dealing with an ethical and knowledgeable contractor with many years of experience. Chances are, you’ll be “pitched” by a sales rep, who will have some nice brochures showing styles and colours, and who will check off an official looking form that lists the type of work to be done on your roof. Very nice. But now, it’s time to start asking the right questions. Such as:
- What specifically is wrong with my roof, and what is working well?
- What are the causes of the things that are wrong?
- What is your evidence that you have got the right causes?
- What are the weaknesses of the roof? Which are potential, and which are causing issues at the present time?
- How will your proposed scope of work correct the causes of the problems we’re seeing?
- Which materials will you be using, and what is your evidence that these are the proper materials in our situation? What kind of warranties are being supplied with the materials? Are there any conditions on our roof that may void these warranties?
- What is your experience in fixing the type of issues we have on our roof? Can we have a list of references of prior work that had the same problem?
- Who is going to do the work? What kind of training and experience do they have? How long have they been working with your company? What licenses and permits do they hold?
- What kind of warranty will you be supplying on the installation (labour)? What are the exclusions, limitations, and clauses that may limit the responsibility you have for the installation?
- What protocol do you follow if you find things after the start of the work, that were not covered in the contract? How will you assure me that this “extra” work is actually needed, and is not an attempt to increase the profits by doing unnecessary work?
What happens when you don’t ask the right questions? Well, you get fed a story, and it may be a very attractive story. But if the story doesn’t address your specific situation, then you’re getting a performance. Performances can be very entertaining, but at the end of the exercise, you will have paid out thousands of dollars for… what exactly? You may convince yourself that you have gotten a deal, and that the end result looks pretty good. But if you haven’t asked the right questions, you may end up with a very expensive band-aid over a problem that was not fixed and will come back again.
Asking the right questions is important. If you don’t know the vocabulary, we can offer you our expertise. It may be to do a full and proper inspection to determine the exact state of your roofing system. It may be to develop a plan to address specific issues in a comprehensive way. It may be to review the quotations submitted and read between the lines to see what will actually be done. It’s always a lot cheaper to get it done right the first time, than to try and fix something after the fact.
And it starts with knowing which questions are the right questions to ask.
(c) 2013 Paul Grizenko
Climate change and your roof.
Whether we believe that human activity has caused or contributed to climate change, the simple reality is that the weather is not the same as it was before. The warming of the atmosphere promotes more evaporation, and this brings an increase in the energy contained in the atmosphere. More energy means more variation, with larger movements of air, stronger atmospheric pressure variation (both highs and lows), heavier precipitation, and much more wind.
In practical terms, this means that winds of 80+ km/hr will be more common, and we should expect at least several times a year when our roofs will see winds of 120+ km/hr. In terms of precipitation, heavy downpours of 30-40mm per hour may be more common, and need to be planned for. We can also expect heavier snowfalls, and rapid changes in temperature.
So… how is your roof set up to handle these weather conditions? Probably not all that well. If your roof was put together to meet the minimums in the building code, which was based on data accumulated prior to the 1980’s, then your roof is built to deal with conditions that have dramatically changed since that time.
The typical roof failure we’ve seen in recent years include:
- Shingles blow-off
- Water infiltration due to wind-driven rain
- Damage to fascia, soffits and siding
- Leakage due to rapid melting of snow accumulating on the roof, then refreezing,
- Leakage due to volume of rain overwhelming the gutters, and backing up the eaves, valleys and end-walls,
- Excessive wear on shingles from water falling from a higher level
- Excessive drying-out due to prolonged heat and sun exposure
- Caulking failures around chimneys, skylights, vents and other roof features
- Excessive snowfalls with up to 24″ or more of snow accumulation requiring snow clearing to reduce the weight on the roof.
It would be a good idea to verify that your roof system can cope with the new conditions, and if weaknesses are found, to determine the best way to “fortify” your castle. If you wait for a news-worthy weather event to damage your roof, you may be looking at a very expensive repair bill, not to mention inconvenience and even some personal danger.
If you haven’t considered it before, maybe it is time to look at some of the newer products and installation methods that have a much better ability to cope with the temper tantrums that Nature seems to throw more often.
At the very least, you may want to look at the incorporating layers of protection that should allow your roof to withstand the more extreme events. Each roof behaves somewhat differently, so an inspection is usually needed to establish the potential weaknesses, and the appropriate counter-measures.
(c) 2013 Paul Grizenko
Waterproofing membranes for roofs – Miracle product or junk?
The last time you had your roof done, you wanted to be sure that the leaks you had before would never happen again, and you made sure that your roofer installed waterproofing membrane to protect your roof. Now it’s winter, and you’re having some leakage issues. WHY?
Let’s start by examining what are waterproofing membranes, and how are they should be used.
There are a number of products that are marketed as waterproofing membranes for sloped roofs. There are different grades, performances and price-points. For the membranes to work properly, they need to be properly installed, under the right conditions, at the right place(s) and for the right purpose. As is true for all building materials, they have both strengths and weaknesses, which must be taken into account by the installers. From their method of application, they are also known as “peel-and-stick” membranes.
In general the membranes work by bonding (melting into) the wood decking, and thereby providing a waterproofing bitumen layer which keeps the water out. The membranes bond well to each other, and to wood (provided it is dry and warm enough). When pierced by a fastener such as a nail, the material acts as a gasket around the nail and resists water penetration. Therefore, if the membrane is applied to the right place, in the correct way, at the right temperature, and to the right materials, it works.
Membranes, however, sometimes fail. It is useful to know the different ways failure can happen.
- The membrane was not installed over dry, solid wood. This meant that the membrane could not bond to the wood, and thereby establish a waterproofing layer.
- The membrane was installed over non-wood materials. This is a common failure, found when the installer did not properly prime the non-wood surface to ensure both adhesion of the membrane and the creation of a waterproof seal.
- The membrane was not overlapped sufficiently. Each membrane has a minimum overlap requirement, and the installers MUST ensure that the bond between successive layers is active. This kind of failure also happens if the membrane was laid vertically when it should have been laid horizontally. The vertical joints are more susceptible to leakage.
- The membrane was cut flush with the edge of the roof. This is a common installation failure, which allows the water that may be on the surface of the membrane to enter the decking at the edge of the roof. Proper installation practice is to run the membrane past the roof edges by at least 1-2 inches to ensure the water stays outside the roof system.
- The membrane was installed over damaged wood or on a joint. Fasteners piercing the membrane at those points will not have the solid wood support that ensures the dimensional stability of the puncture point, and therefore, water will enter the roof system through the nail holes in those locations.
- The membrane was installed over a non-ventilated space. This may become a very serious issue if the space is NOT sealed, and may contain moisture or water vapour. This is known as “trapping” the moisture, and will lead to both wood rot and mold (potentially toxic) in the spaces.
- The membrane cracked or torn, letting in water. This can happen if the membrane was left exposed to the sun for longer than the manufacturer recommended, or if there was movement in the structure that put tension on the membrane. This can also happen more easily with cheaper membranes.
- The wrong kind of primer was used, leading the materials to “melt” the membrane, instead of providing a suitable attachment point.
There are, of course, many more ways the membranes can fail to work, but as can be seen above, if a membrane doesn’t work, it’s almost always because the installer failed to do the installation properly. Proper application of the membrane takes time, and ensuring that the overlaps are all properly sealed, and that the junctions to various roof penetrations are properly primed and joined, is detail work that cannot be rushed. As well, as in painting, if the proper preparation is not done, then the adhesion of the waterproofing layer is going to be compromised.
In our experience, the failure of the waterproofing layers is a very common reason for replacing a roof prematurely. Unfortunately, once the roof covering is on, it’s impossible to verify whether this critical element was properly installed. In practice, if the cause of a roofing failure is suspected to be linked to the membrane, it is often necessary to disassemble the roof system and to do an “autopsy” to determine the cause of the failure.
So, how do you ensure that the waterproofing step is properly done? There are a number of steps that help you get to the desired result.
- Check the products that will be used. Get the brand names, the product names, and the installation specifications. Read carefully the parts about what NOT to do. Make sure that the manufacturer’s suggested use covers what you want to use it for.
- If you’re having someone else install the products (your roofer, for instance), ask them to explain where they would use the products, what kind of preparation they will do, what kind of verification or quality control they will do to ensure the materials will work as intended. Ideally, they should be able to show photographs of prior installations where they did the membrane application. Probably more important, is asking them under which circumstances the products did NOT work, and what they would do if those circumstances were found on your roof.
- Once the installation starts, you need to check how the material is being installed. How well was the roof preparation carried out? Are the non-wood surfaces being primed with the appropriate primer? How are the overlaps sealed? Is the edge of the roof being overlapped? Imagine water running on the surface. Where will it go? Is there a chance for obstruction? Is there any apparent damage to the material during the course of installation?
- Once the installation is complete, but before the covering or flashing is put over the membrane, the surface needs to be verified as to its adhesion, overlap, and coverage. It is a good idea to request (in the contract) that photographs be taken of all roof penetrations, roof joins (such as valleys, endwalls, sidewalls), and roof terminations (rake or gable end, eave, hip, ridge) to show how those details were executed. Alternatively, hiring a third party to conduct an inspection at this stage is another way to ensure that this critical step in the process is properly done.
- Occasionally, especially with complicated roof lines and assemblies, it is appropriate to conduct a water test to ensure that there are no weak spots in the water-proofing coverage.
- If membrane will be installed over the entire roof, it is really, really important to ensure that EITHER the roof system below the membrane is sealed and impermeable to water vapour, OR that it is well vented, so that any moisture trapped under the membrane can escape. If a roofer or contractor agrees to install the membrane over the entire roof without make sure that either condition exists to a satisfactory level, they are being at best ignorant, and at worst, willfully negligent.
Of course, the membrane protection is only part of a well-constructed roof system. Good installers will build in several layers of over-lapping protection to ensure that there is no single point of weakness that can undermine the efforts put into building the roof system. If you’re not sure what needs to be done with your roof, give us a call. We can give you an intelligent analysis of what issues are important in your situation, and what you need to do to make sure your system works.
(c) 2013 Paul Grizenko
Links:
Below are two membranes that we use routinely, and that have been, in our experience, proven to work well, provided they are used correctly.
Grace Ice and Water Shield Membrane: http://www.sg.graceconstruction.com/custom/underlayments/downloads/guide.pdf
Interwrap – Titanium PSU membrane: http://www.interwrap.com/downloads/roofing-docs/TITANIUM_PSU-30_BROCHURE.pdf
Further information:
If you are interested in knowing more, use the contact form (under the Contact Us menu selection), or give us a call at 514-636-2300.
When is a roof leak not a leak?
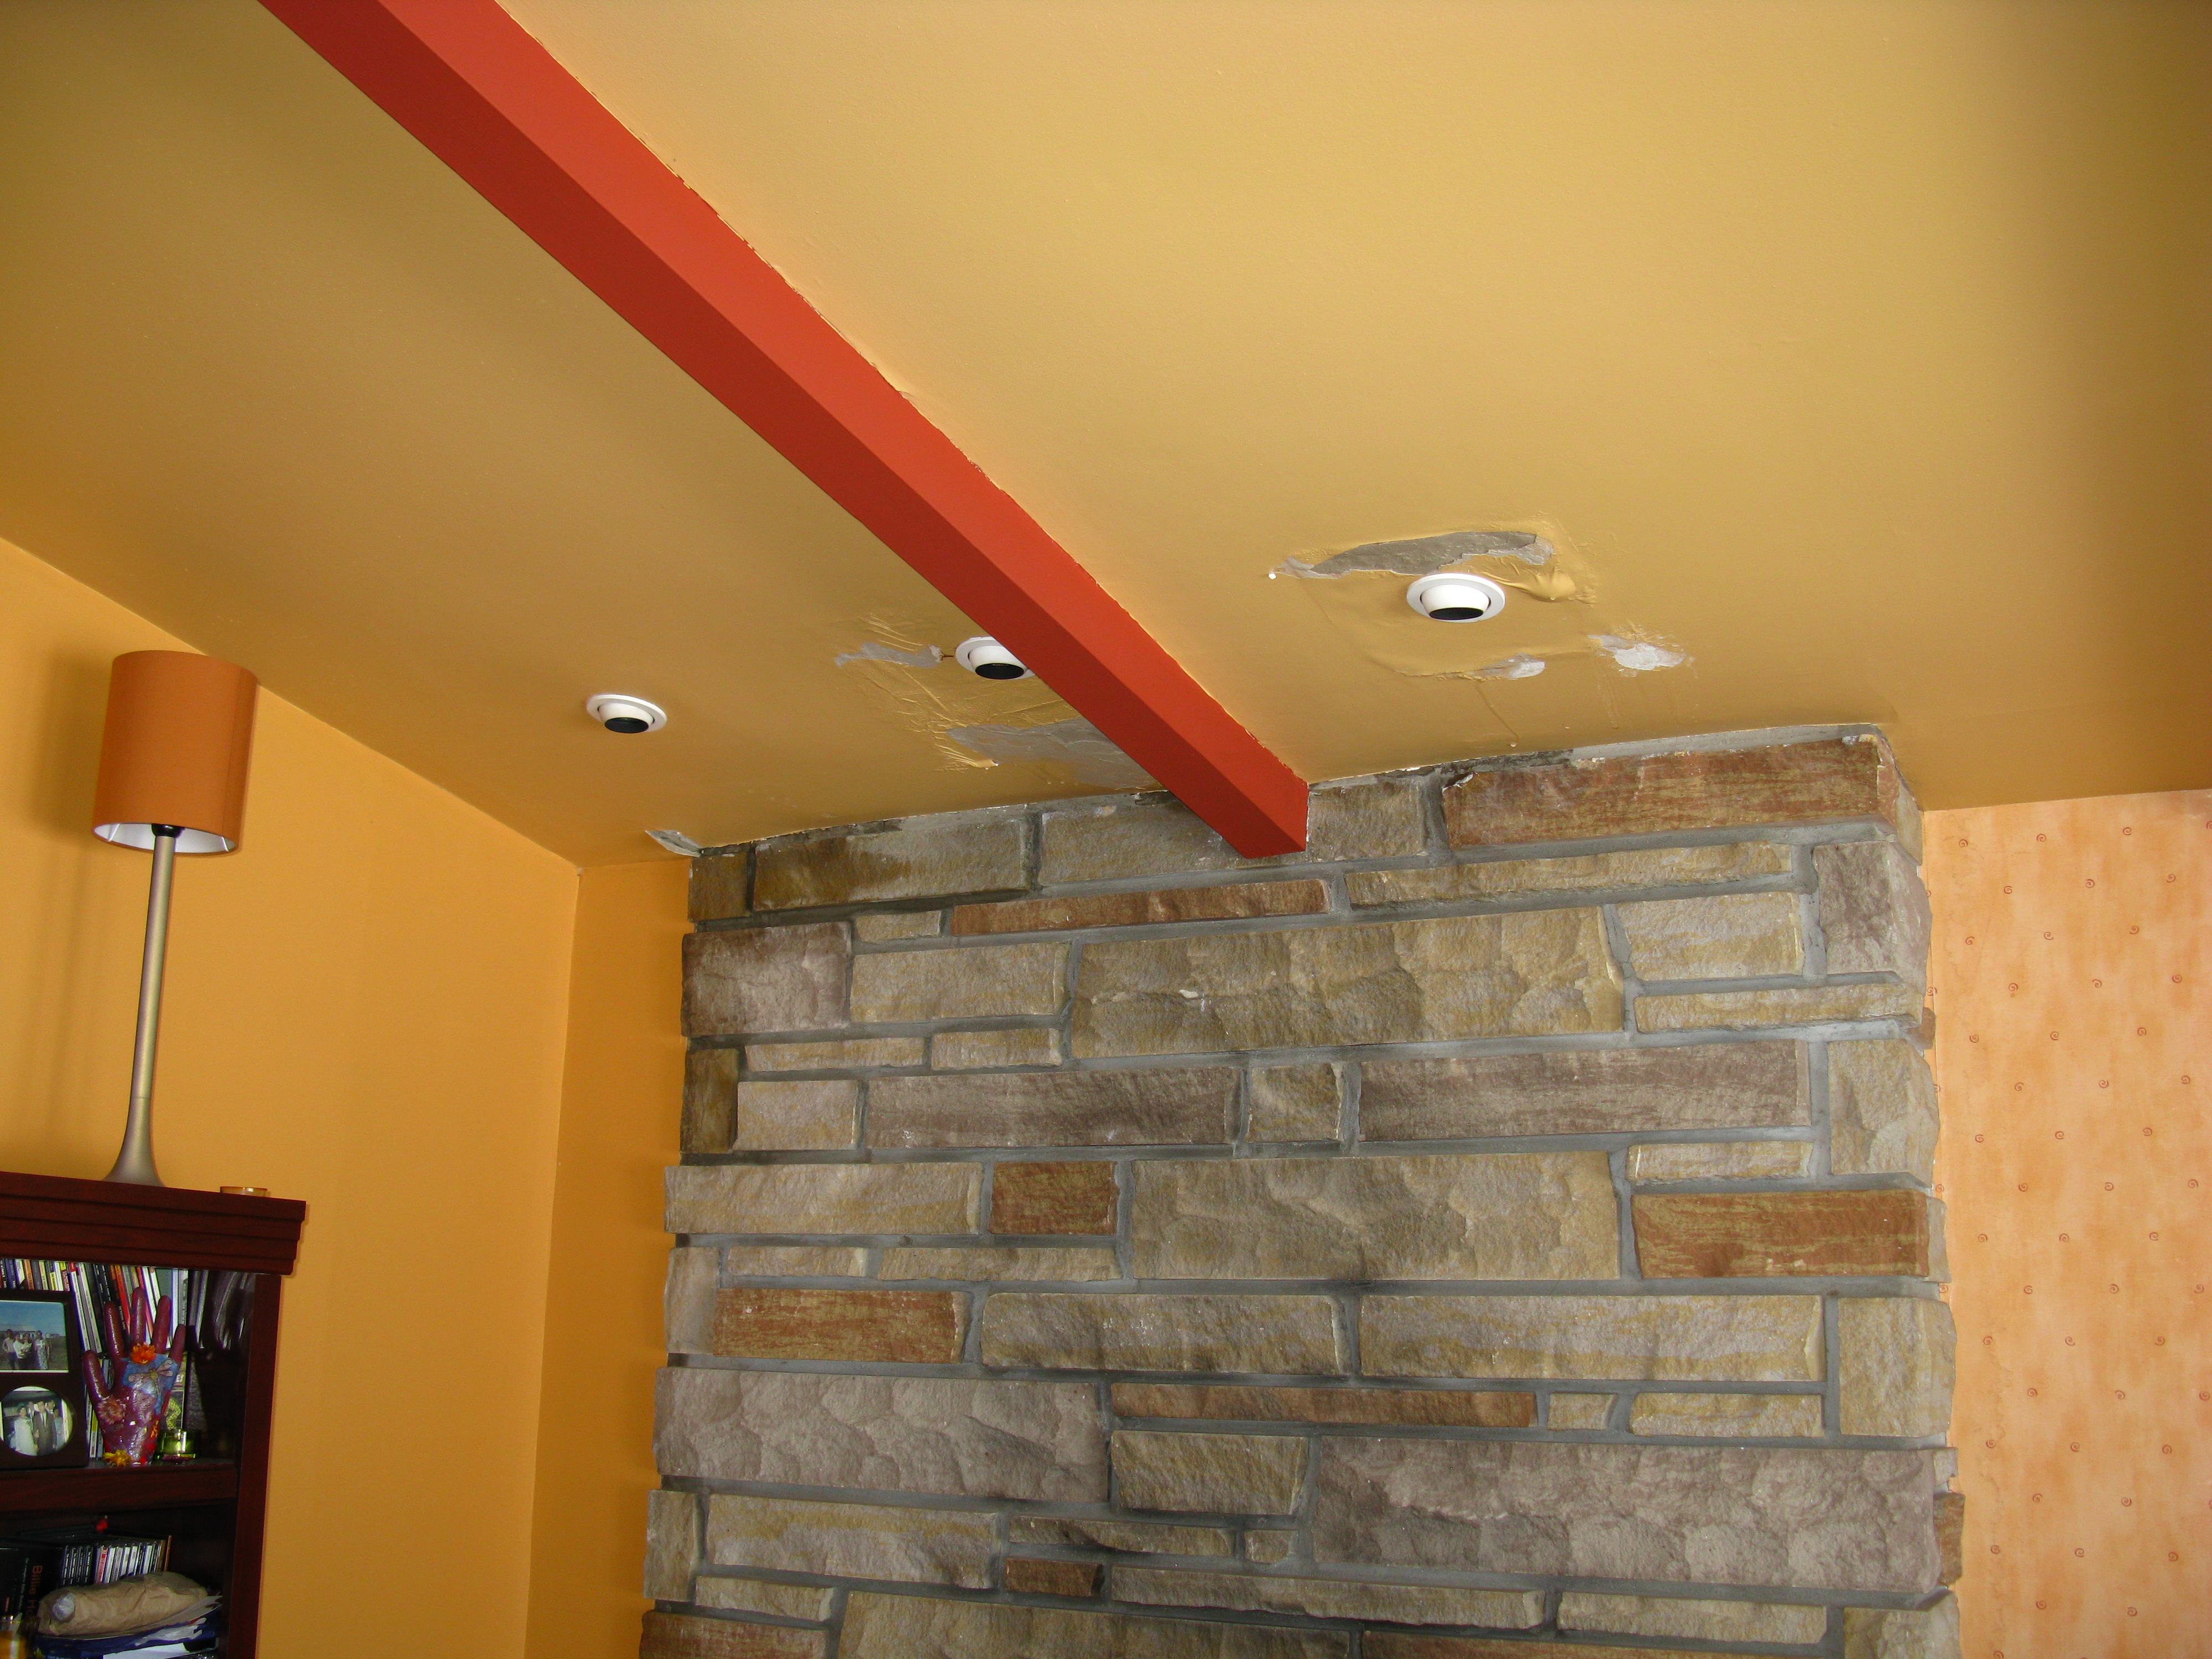
We were asked to investigate this leak. It turned out to be due to condensation. The pot lights were added much after the construction of the house, and the installer did not use an air-tight insulated box for each light. As a consequence, warm and humid interior air entered through the pot-light enclosure into the ceiling cavity, and with minimal insulation left (because it was mostly removed to make room for the pot lights), there was a LOT of condensation.
The do-it-yourself remodeller also made similar mistakes elsewhere in the house, piercing the vapour barriers, and not allowing any air circulation above the insulation. As a result, the interior air infiltrated the cold spaces and almost “rained” condensation into the interior.
In the section https://prsconsulting.wordpress.com/links-and-useful-information/, there is a link to a very good article in Fine Home-building Magazine which discusses ventilation issues and has some nice diagrams showing show how the ventilation should work.
We also have had reported leaks in bathroom fans, which turned out to be condensation, and other “leaks” which turned out to be condensation from poorly insulated air ducts conducting cold air (in summer, obviously). So when you spot a “leak”, it may not be what you think it is. Time to do a little sleuthing.
(c) 2013 Paul Grizenko
You have OSB as your roof sheathing. Do you cheer or panic?
That depends on what grade the OSB panels are, and whether the right panels were installed. OSB (which stands for Oriented Strand Board) is a variant of plywood, and is an engineered product, meaning that each type of OSB panel has defined end-use and method of application. Information on the types of panels and their uses can be found here: http://www.apawood.org/level_c.cfm?content=pub_osb_libmain
The panels are manufactured in two grades: Exterior and Exposure 1. “Exterior panels have bonds capable of withstanding long-term exposure to weather.” The Exterior 1 grade “is intended to resist the effects of moisture due to constructions delays or conditions of similar severity”. Which means that if the OSB panels have been installed as roof sheathing, then a few days exposure to the weather is permissible before the tar paper or other underlayment is installed.
If the roof panels are Exterior grade, then you have nothing to worry about. Most of the panels installed as roof sheathing, however, are Exposure 1 grade, which means they CANNOT be exposed to long-term moisture. That is fine, as long as the roof doesn’t leak, or condensation doesn’t happen. Leaks, when they do happen, generally start gradually, and it may be several years before a leak is detected. By that time, the OSB has been exposed “long-term” to weather (which in this context, means water), and therefore the glue holding the wood chips (strands) together starts to dissolve. This leads to the weakening of the panel, as well as causing it to swell and buckle with absorbed moisture. Persistent condensation will do the same.
In short, if you have Exterior grade OSB, you can change your roof when it’s due – the panels should not be affected. If you have Exposure 1 grade, then you should carry out a regular program of attic inspection to ensure that no water is getting in. Otherwise, the cost to reroof may have to include the cost to redeck the roof, and do whatever mold remediation that is necessary.
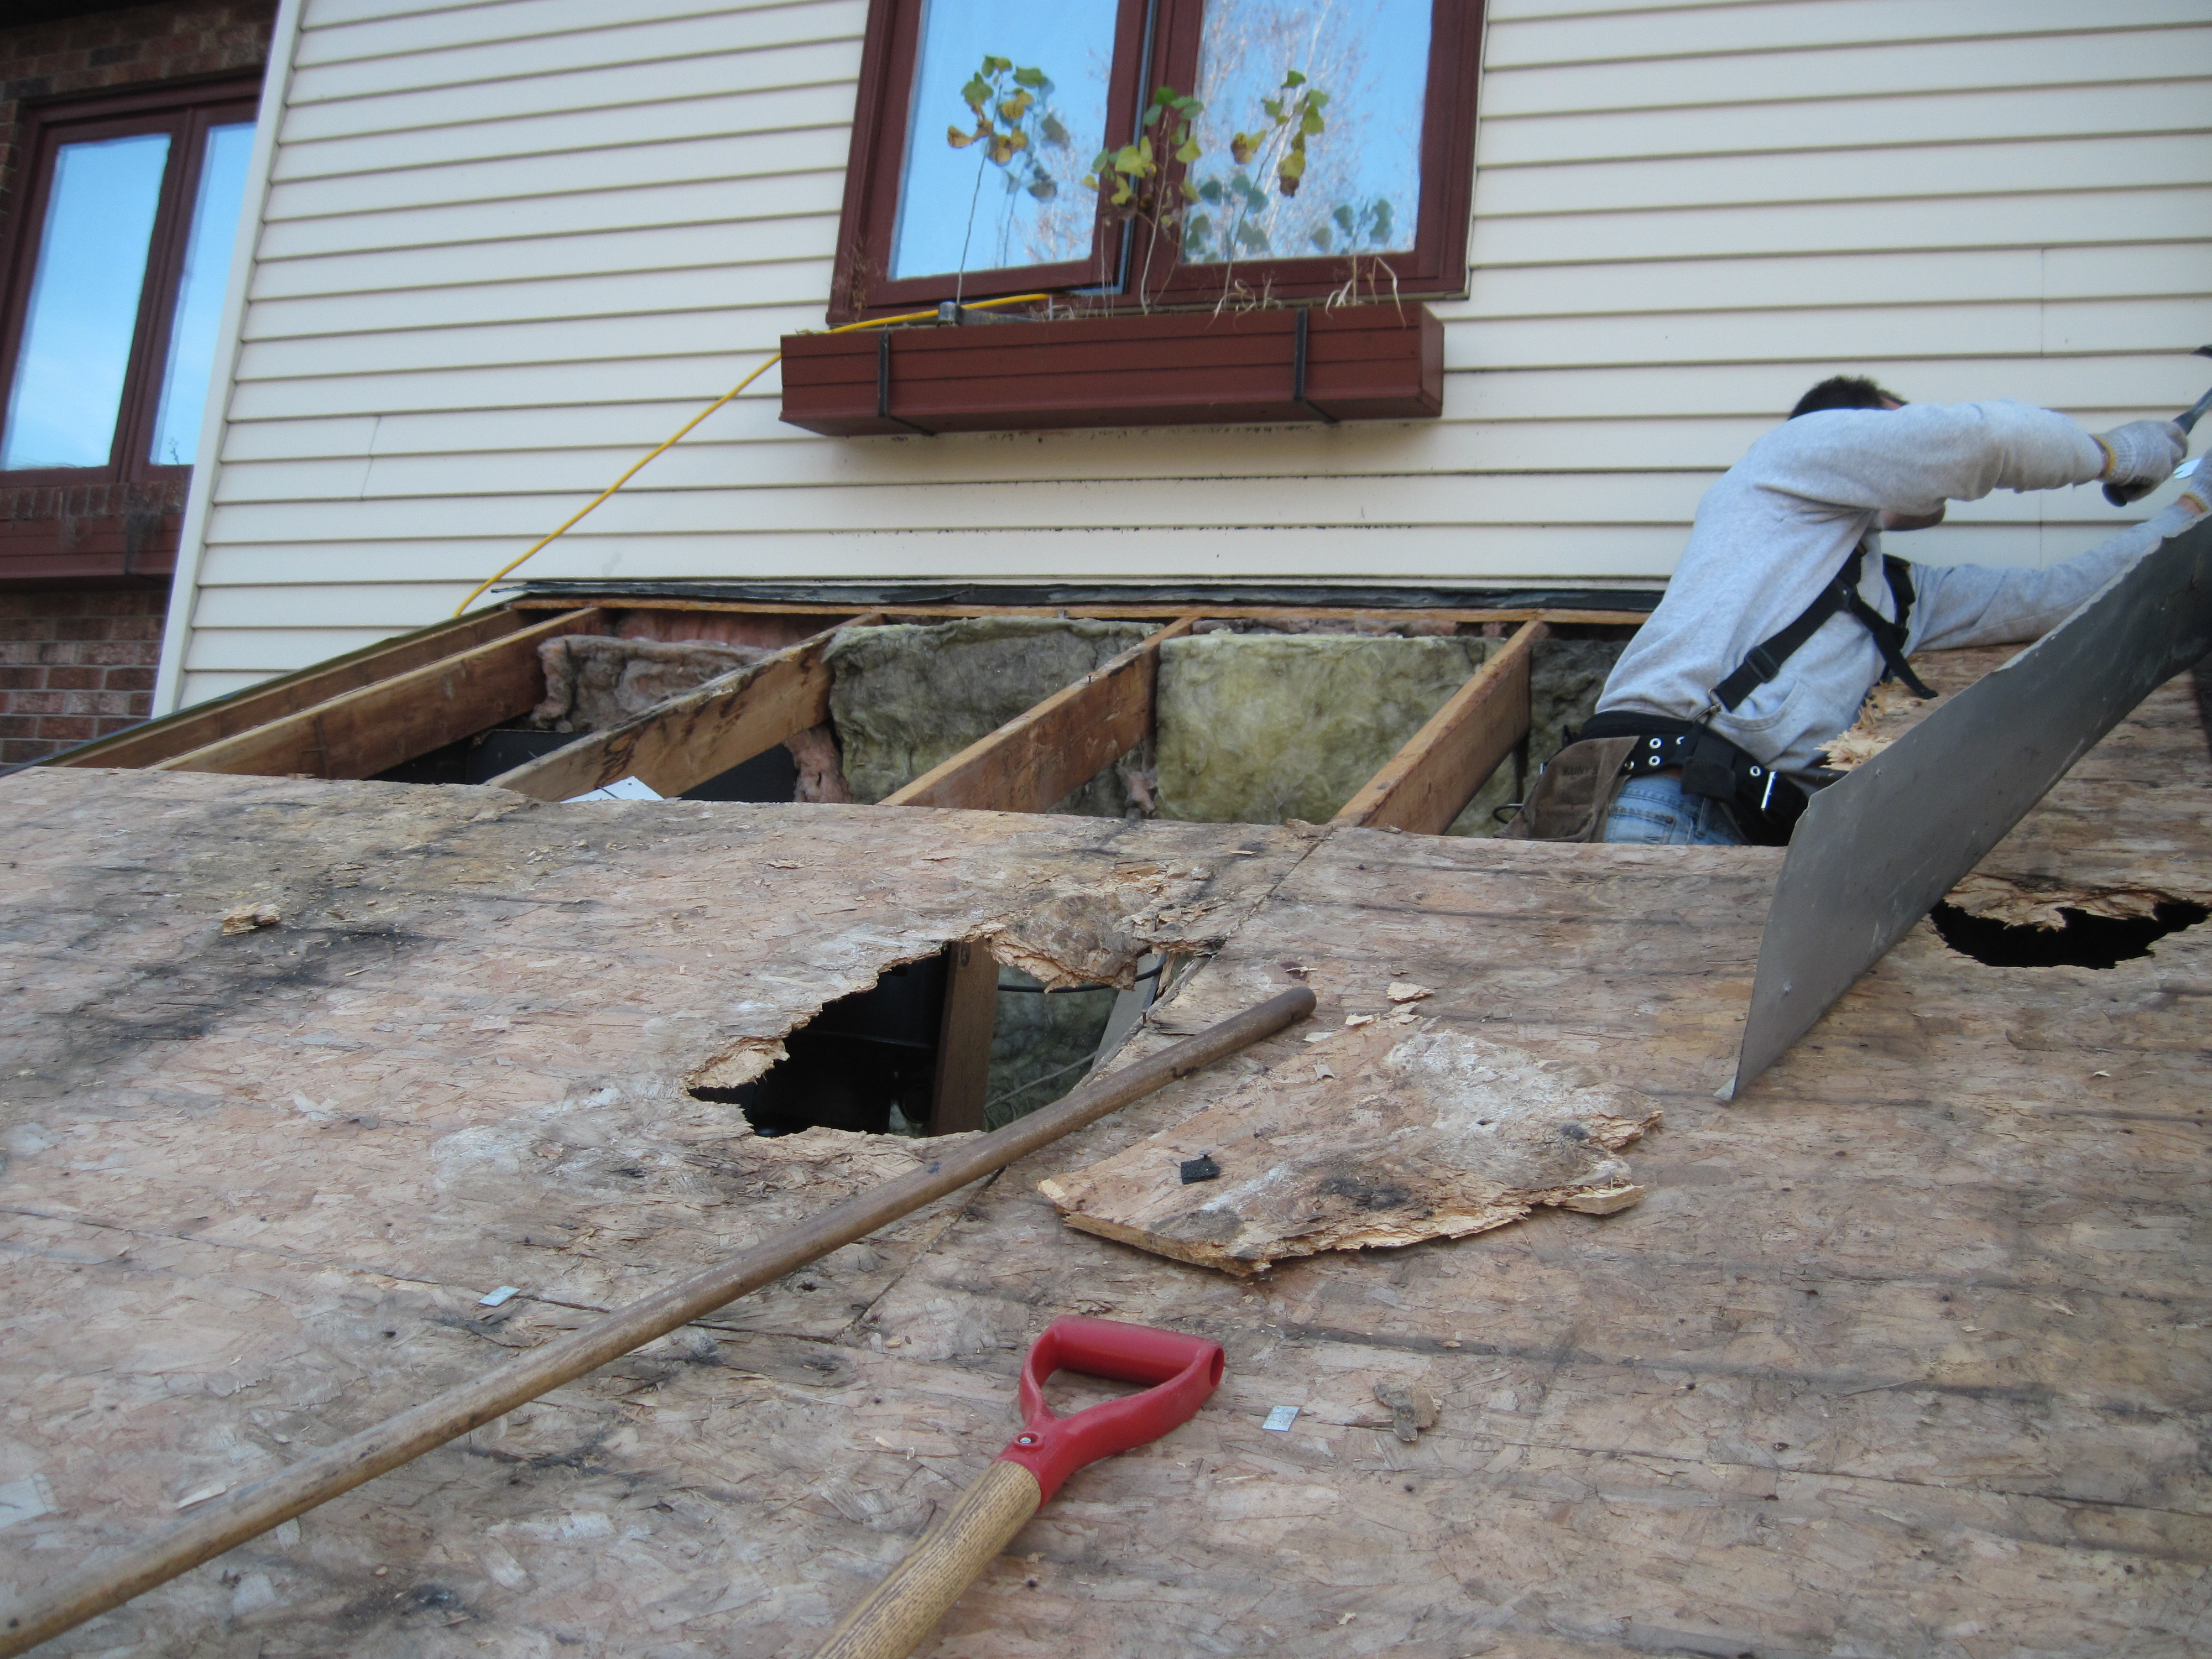
OSB damaged by persistent leakage, being removed. Note the dark stains in the insulation. It too will be removed.
From another installation / repair, we had very localized leakage, but it ended up ruining that piece of OSB.
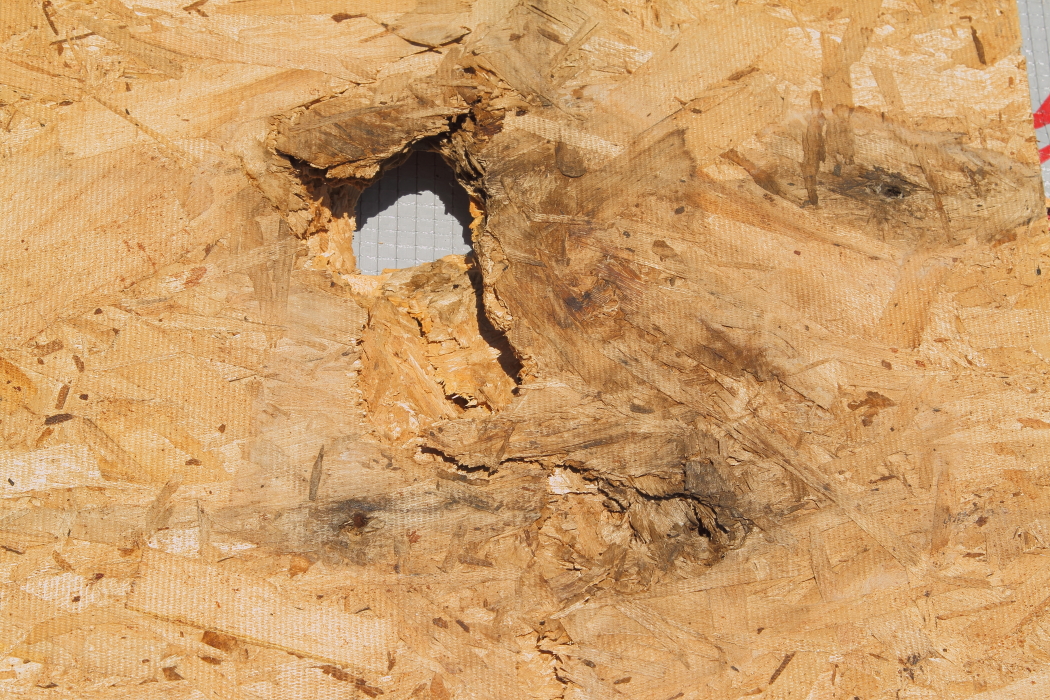
Damaged OSB. Leakage was localized but still need to be redone.
If you’re not sure of what you have, or if you know you have OSB but aren’t use what state it is in, give us a call. We’ll do an inspection and tell you our opinion.
(c) 2013 Paul Grizenko
It’s winter. And you have a roof problem. Now what?
In Quebec, winter provides all kinds of challenges to your roof, from freezing rain, to severe temperature changes, to strong winds, to very cold temperatures, to snow accumulation, to rapid ice/thaw cycles. With the climate change that we are all living through, the weather extremes become more pronounced and more frequent. If your roof is not well-designed and well-installed, the weather will find the roof weaknesses, and you WILL have problems.
In winter, the most immediate problems are usually leakage and ice damming. The longer-term dangers are caused by leakage, condensation, and snow accumulation. Sometimes, wind can damage poorly installed flashings or soffits.
If you have leakage, there are a number of possible causes:
- ice-damming,
- caulking failure,
- flashing failure,
- underlayment or membrane failure,
- failure of waterproofing seals,
- incorrect choice of vents and vent positioning,
- aging of key components that no longer keep the water out,
- fastener seal failure,
- blocked valleys,
- blocked gutters,
- internal condensation
- and other causes that are not as common.
The first step is to figure out why you have a leak when you had none before. As can be seen from the above list, there are many things that can cause an apparent leak. Each possible cause has its own set of diagnostics, and leaping to conclusions usually ends up costing money and doesn’t fix the problem. Finding a leak can be particularly challenging if the roof system was not well built, or if the water has travelled along the vapour barrier.
Ice Dams can appear even with well-built roofs, if the conditions are just right. However, they usually signal a combination of insufficient insulation and ventilation. Older homes, built under codes that were not as stringent as they are now, often have ice dams and massive build-up of icicles decorating the roof eaves. Once the water starts building up behind the ice dam, it is under pressure, and enters any opening, crack, or gap. If the waterproofing is not perfect, you have a leak. If the roof was built with multiple levels of protection, then the water at the ice dams usually stays outside, but if there is only one layer of protection (typical of cheaply-built roofs), then there is no margin of error. Any failure in that one layer will result in a leak.
Occasionally, “leaks” are caused by condensation. How is the moisture getting into the attic or cold spaces in the first place? We find any number of reasons when we start looking for causes – but almost always, it is due to some error in venting, or in a seal that is no longer working. We’ve seen bathroom renovations where the contractor directed the air vent from the bathroom directly into the attic, and more than one case of clothes drier vents being installed with their outlets inside the roof system. We’ve also seen home renos where the potlights were installed in ceilings without the proper sealing, and ended up causing massive amounts of condensation by letting in the air from the living space into the cold spaces.
So, what do you do when you think you have a leak? Call an expert – we’ve seen more of the underlying causes and reasons than you ever will (unless you are really, really unlucky), and we’ll know where to start looking. Depending on what we find, we may be able to fix it quickly, or we may suggest some temporary measures until we can fix it properly once the snow is off the roof in spring-time. Under extreme situations, we can (and have) rebuilt roofs in winter, so it is possible to do, but it can get expensive.
The best way to not have these problems, is to make sure all the fundamentals are working correctly. That means ensuring that your vapour barrier is effective and complete, that you have enough insulation of the right type, that your ventilation is set up in a manner appropriate to your style of home, that there is the right amount of waterproofing (membrane and seals) in all the places where water can appear, and that there is the right layering of protection (membrane, underlayment, flashings, caulking) in all the susceptible areas.
Your home is your most important investment. Shouldn’t you have the best protection for it that you can have?
If you’re not sure you have it, contact us and let us arrange an inspection.
(c) 2013 Paul Grizenko

Ice dam as seen on the outside – lots of icicles!
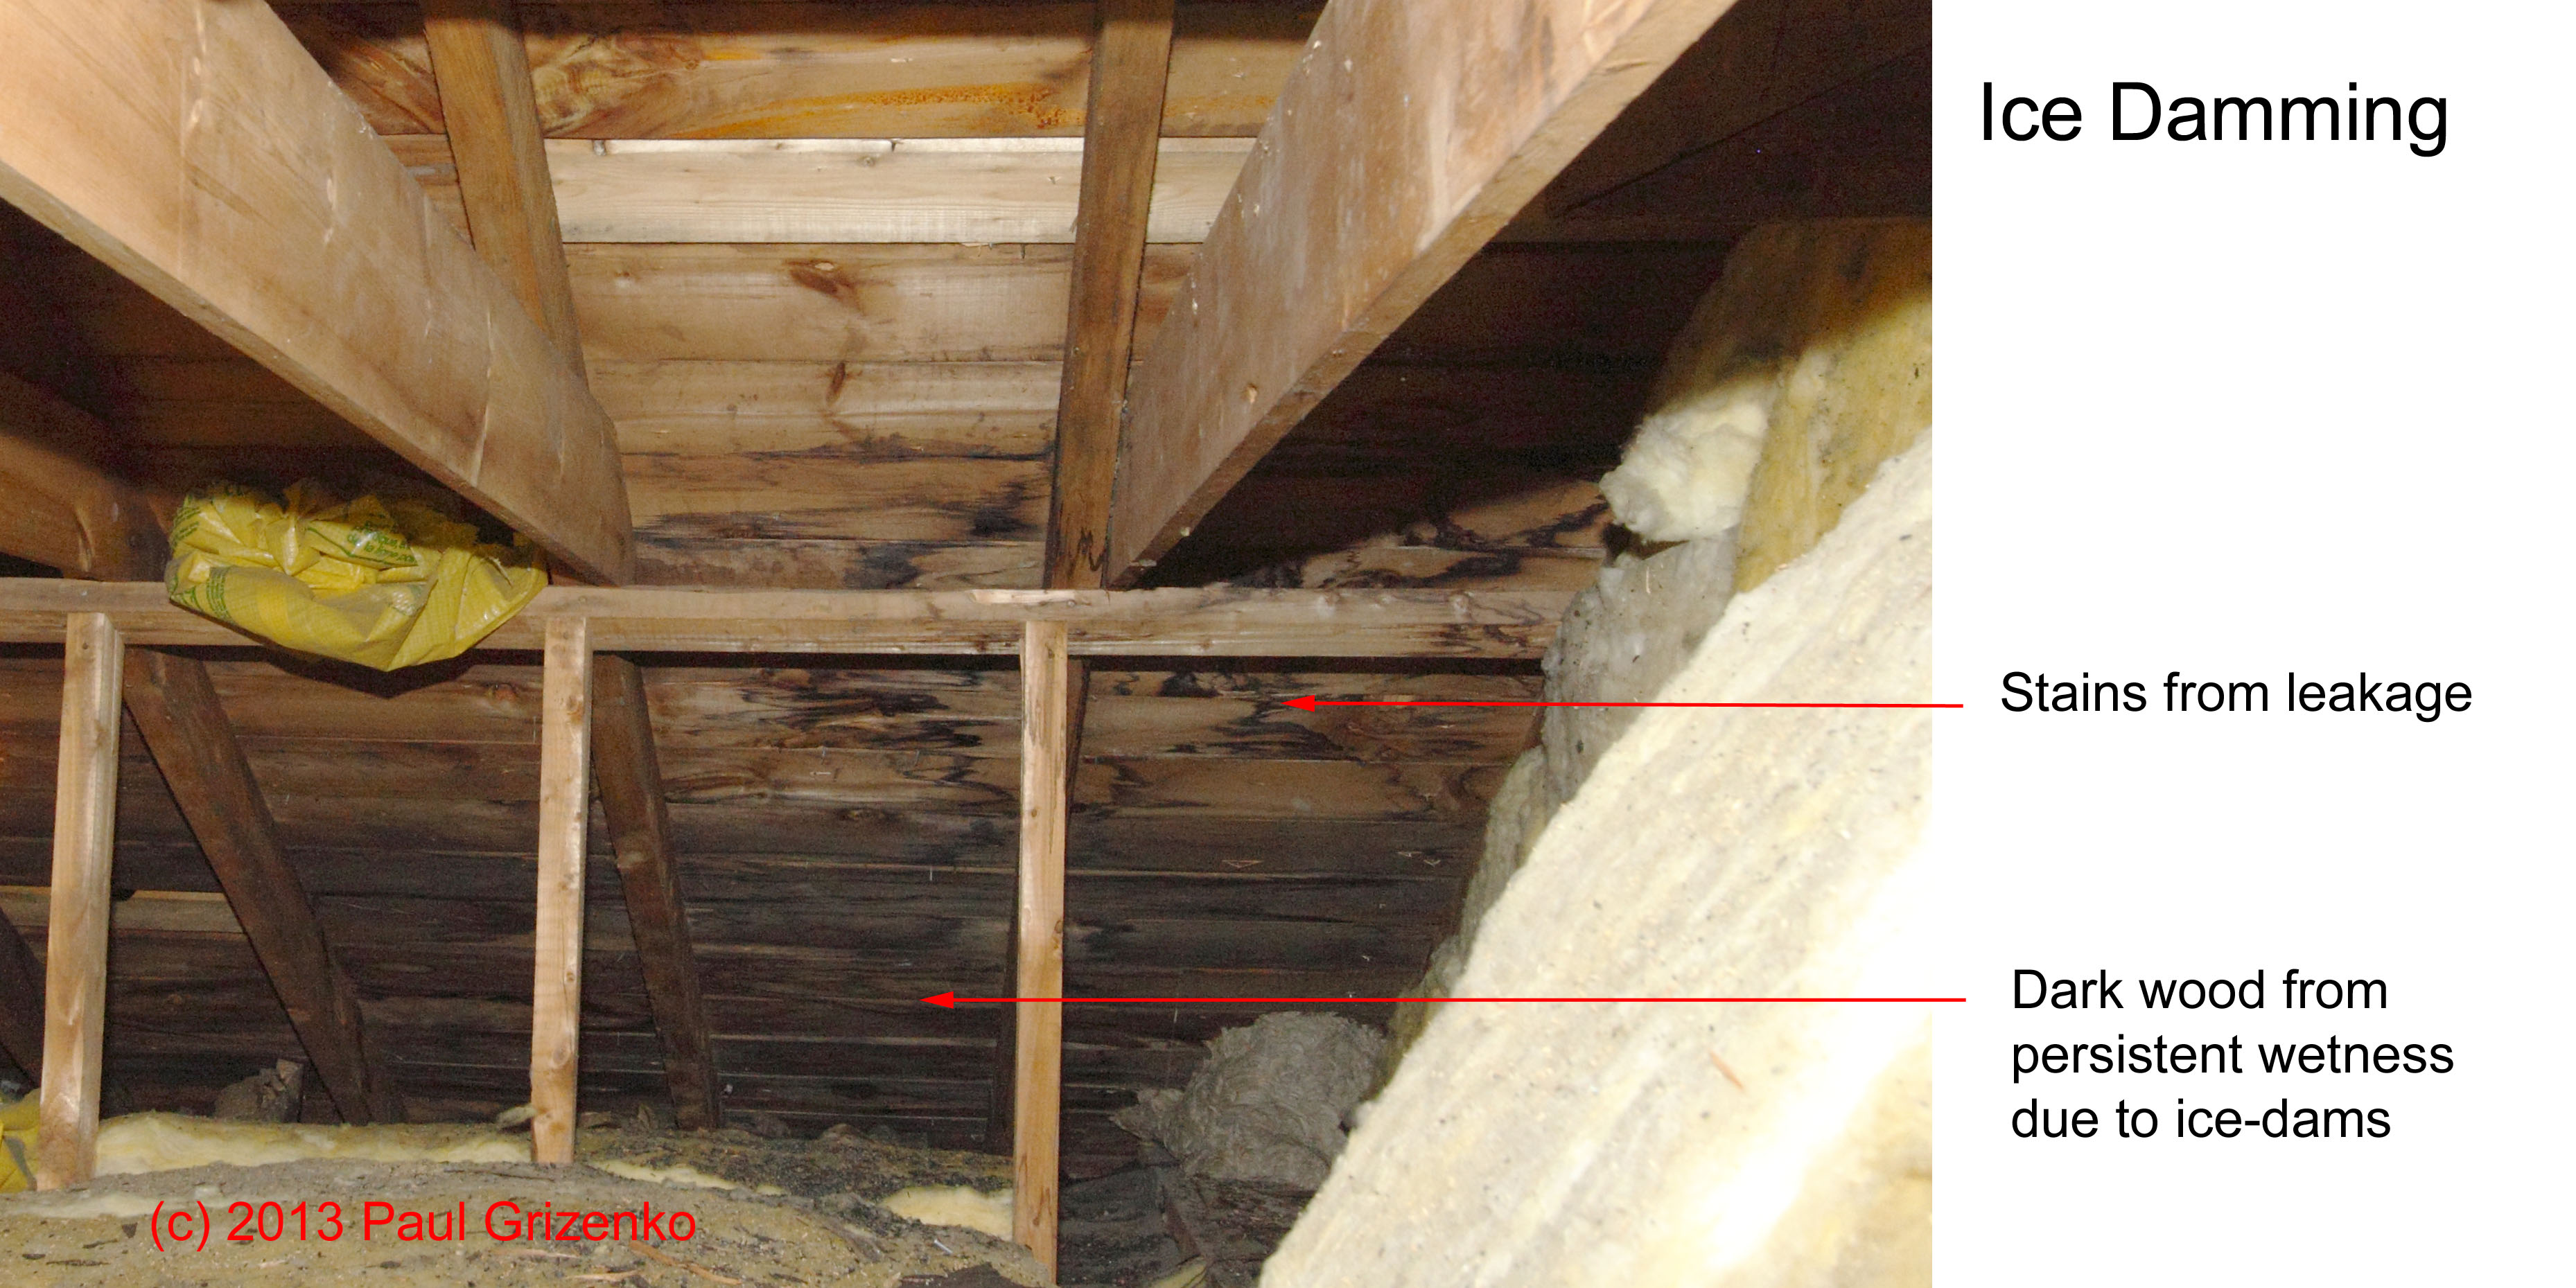
Image shows leakage and persistent wetness of the decking. Water has entered insulation and the gyproc underneath.
