Installing two roofs – why bother?

Most people assume that the visible external roof covering is the “real” roof, which functions to keep the water and weather out of the roof system.  This is true for flat or low-slope roofing materials, but not true for steep-slope materials (which is anything over a 3:12 roof slope).  Steep-slope materials are designed to shed water.  That means that water is supposed to run off the surface, and if properly layered, the water stays on the outside.  However, if wind or a physical obstruction interrupts the water flow, then it will go under the roofing material.  This is true for all steep-slope roofing material, whether it is made of asphalt shingles, or metal shingles, or metal panels, or cedar shakes, or slate.

It’s the unappreciated and unloved underlayment layer that’s below the top layer that has the job of actually keeping the water out.  That layer is the “true” waterproof roof, which is composed of layering of flashings, membrane, underlayment, and sealants.  It’s also the layer which is easiest to skimp on when the contractor is being pressed to come up with a low price.   If you can’t see it, and you don’t even know that it needs to be there, then why would you want to pay for it?

How does the saying go?  Ah yes.  Penny-wise, pound foolish.

Continue reading

Roof Leaks, the “invisible”kind

What’s a “roof leak”?

For most people, a roof is leaking when the ceiling gyproc starts to discolour, or bulge, or when the paint starts to bubble.

LR_PRS_PB_003A

This usually happens after a heavy rain, or at the end of winter when the snow is melting off the roof.  Yes, those are usually leaks.  They are easy to notice and impossible to ignore.  However, the sad thing is that the cause of the leak is usually several years in the making, and by the time the leak is noticed, there is lots more damage that has occured.  In other words, the apparent and visible leak is preceded by “invisible” leaks that start (often) many years before the leak is apparent.  This post is about these invisible leaks.

Continue reading

You’re mad -your roofer didn’t do the job

You were happy to have the roof done a few years ago and you were delighted when the roofer told you he saved you money.  Except that now your gyproc is showing signs of water damage, and the last roof lasted 15 years without any leaks in that location.  What should you do?

The quick answer is:

  1. Diagnose the problem
  2. Identify the probable cause
  3. Assemble your evidence
  4. Notify the party responsible in writing
  5. Give adequate time for the party responsible to respond and correct
  6. If no acceptable solution is reached, escalate

The long form of the answer follows below.  (Disclaimer:  I am not giving legal advice in this post.  The following discussion is only one of the ways such issues can be resolved, and there may be other mechanisms available to you that are not covered in this post).

Continue reading

Asphalt shingle blow-off – how does it happen? And what can you do about it?

If you have an asphalt shingle roof, having the shingles blow off in the wind is one of the ways it can fail.  This post explores what this failure looks like, the possible consequences, some of the causes, and how to ensure this doesn’t happen to you.

Shingle blow-off happens with both new and old roofs.  The more common failures happen near the rakes/gables and below the ridge-line.  There are several causes, some relating to the quality of the installation, and some to the quality of the product.

New roof, shingle blow-off

New roof, shingle blow-off
(Click on image to see it full size)

This image shows a recently installed roof (about 2 years old), which already experienced shingle-blow-off.  While the shingles themselves were installed with a certain degree of care in terms of placement, the nailing pattern shows that the installer did not follow the standard practice, and nailed them too high, which shows either that they didn’t care, or were in a hurry and did place the nails in the right places.  In addition, this particular roof is getting winds directly from the lake without any protection, and the roofers did not attempt to increase the wind resistance of the roof by using any of the techniques for high-wind installation.

Shingle Blowoff_MG_8894_v2

New roof with shingle blow-off
(Click on image to see it full size)

This is a new roof, installed in the fall.  In the spring, the roof is already showing wind damage.  It appears that the fall installation resulted in the tar strips not sealing, and although the roof “looks” well installed, it will continue to fail.  To quote the warranty from one shingle manufacturer (BP) ( http://bpcan.com/CMS/Media/32629_53_en-CA_0_WARRANTY_Shingles_Ltd_EAST.pdf ):

“For the Warranty against wind blow-off to take effect, the self-seal adhesive must be subjected to sufficient heat to activate the bond. When the shingles are installed in environmental conditions that will not produce such temperature or in very windy areas, the shingles should be sealed down with spots of asphalt plastic cement as specified in CSA A123.51-M85.  In addition, contamination of the self-sealing adhesive by dust or foreign matter may prevent the sealing strip from achieving  a full thermal seal. Prior to sealing, shingles are more vulnerable to wind damage.”

 The concern about proper sealing of the tar strip is also seen in the warranty language of IKO (another shingle manufacturer): (http://www.iko.com/publication/iko-manufacturing-warranty/wppa_open/):

(i) the Limited Wind Resistance Warranty will only apply if: (a) the Shingles were installed using roofing nails (not staples) in strict accordance with the instructions on the wrapper and (b) for installations in Canada during the fall, winter or in cool weather, the Shingles have been manually sealed at the time of installation, and for installations at all other times in Canada, and at all times in the U.S., the Shingles have been manually sealed at the time of installation, or have had the opportunity to seal down;

 In short, if the installation of the shingles takes place late in the season, then the roofer needs to take extra precautions to ensure that the shingles do NOT lift prior to the roof having enough heat to melt the tar strips, and therefore effect the seal.

Shingle_Blowoff_IMG_0411_v2

Shingle blow-off despite attempt at “sealing”
(Click on image to see it full size)

 In the above example, the roofer obviously considered the possibility of blow-off and dabbed each shingle with some roofing cement.  However, they did not follow the recommended practice, and the roof still ended up with shingle loss. 

Shingle_Blowoff_IMG_1142_v2

Workmanship as a contributing factor to shingle blow-off
(Click on image to see it full size)

 This example shows the effect of poor workmanship.  The nailing pattern is too high, the shingle alignment is poor, the flashing work is certainly lacking, and there any many signs of a hurried installation.  It can be seen that some repairs were attempted. 

Shingle_Blowoff_MG_8769_v2

Shingle blow-off due to loss of shingle flexibility.
(Click on image to see it full size)

As the asphalt shingles age, they become more brittle.  In some products, there is also shrinkage of the felt and some clawing or curling.  In the above case, the shingles did, for the most part, stay flat, but as can be seen on a number of shingles, started to crack horizontally.  If the tar strip is only partly sealed, then this provides very little resistance to wind forces, with the result that the shingles are susceptible to blow off.

Shingle_Blowoff_IMG_1195_v2

Shingle blow-off can lead to deck damage.
(Click on image to see it full size)

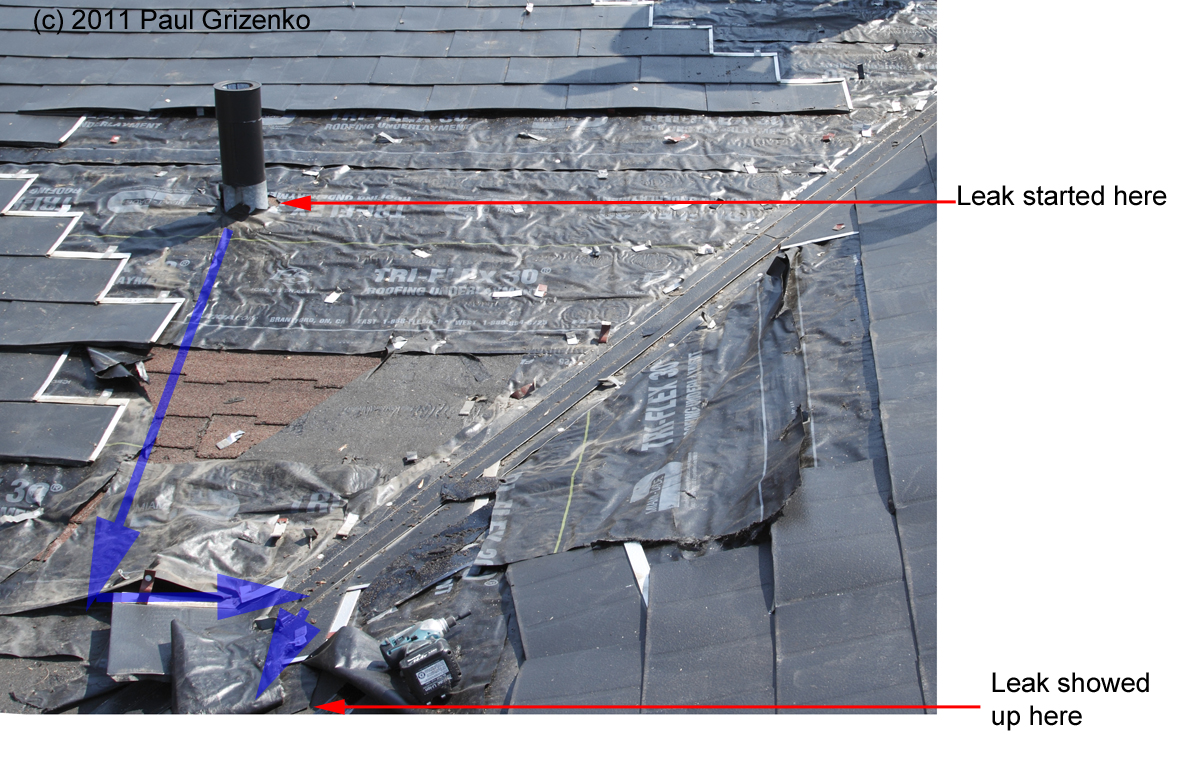
In the above example, we can see that the wind blow-off exposed the deck.  This is another example of the roofer apparently cutting corners by not installing any kind of underlayment under the shingles.  If the wind was strong enough to break off the shingles, it is also strong enough to blow rainwater in between the shingles and onto the roofing deck.  If the roofing deck is not protected by underlayment, then this will result in persistent wetting of the deck.  Depending on the type of decking, this persistent wetting may cause delamination of the plywood, or complete loss of structural integrity in OSB, or contribute to rotting of wood.

Decking with no underlayment_IMG_0062_v2

Deck damage due to lack of working underlayment.
(Click on image to see it full size)

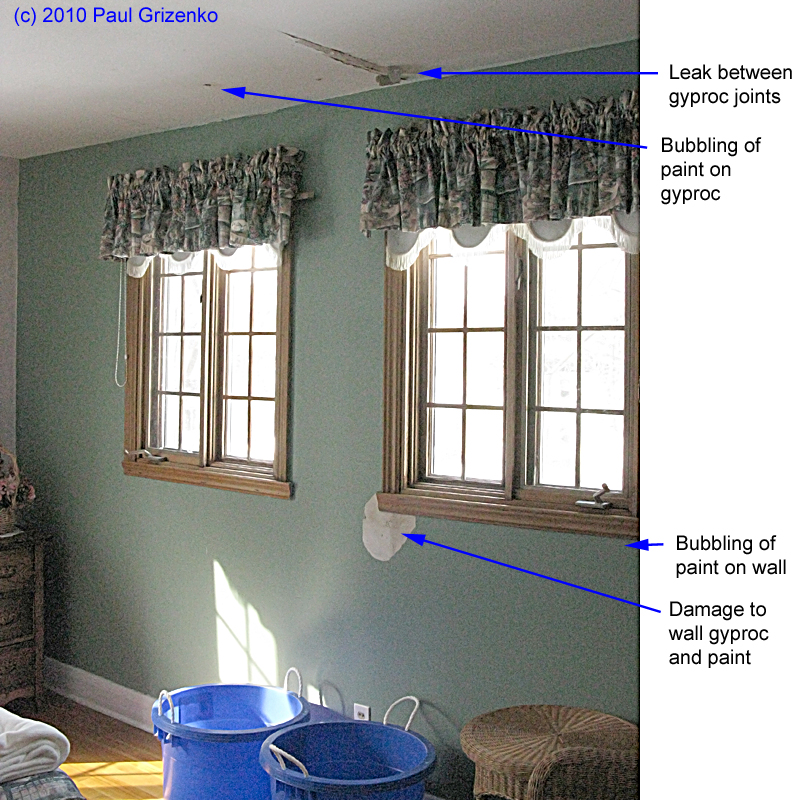
This image from inside an attic, shows what happens when there is no underlayment (or poorly installed underlayment).  Water has been seeping into the deck, causing:

  • Delamination of the plywood (as can be seen by the cracking of the wood veneer),
  • Rusting of nails (every nail is rusty)
  • Entry of water into the attic interior, which increased humidity in the attic and supports growth of mold (see the dark marks on both the underside of the wood, and in the insulation,
  • Loss of decking integrity (as can be seen at the movement of the wood at the H-clips).
Damaged Decking_MG_5446_v2

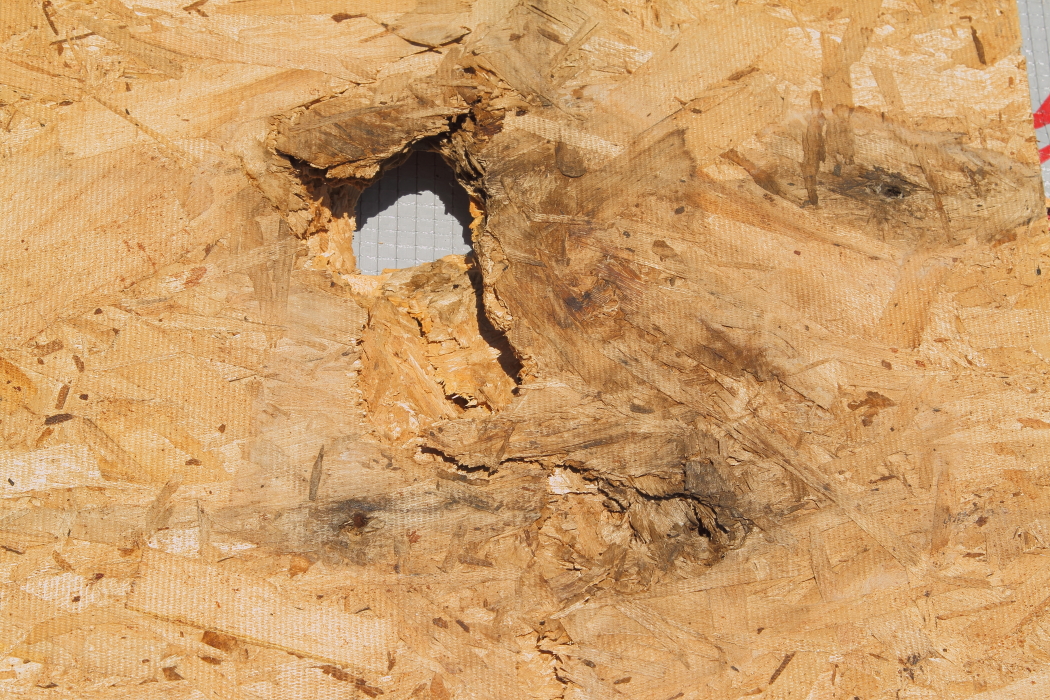
Deck damage due to missing underlayment.
(Click on image to see it full size)

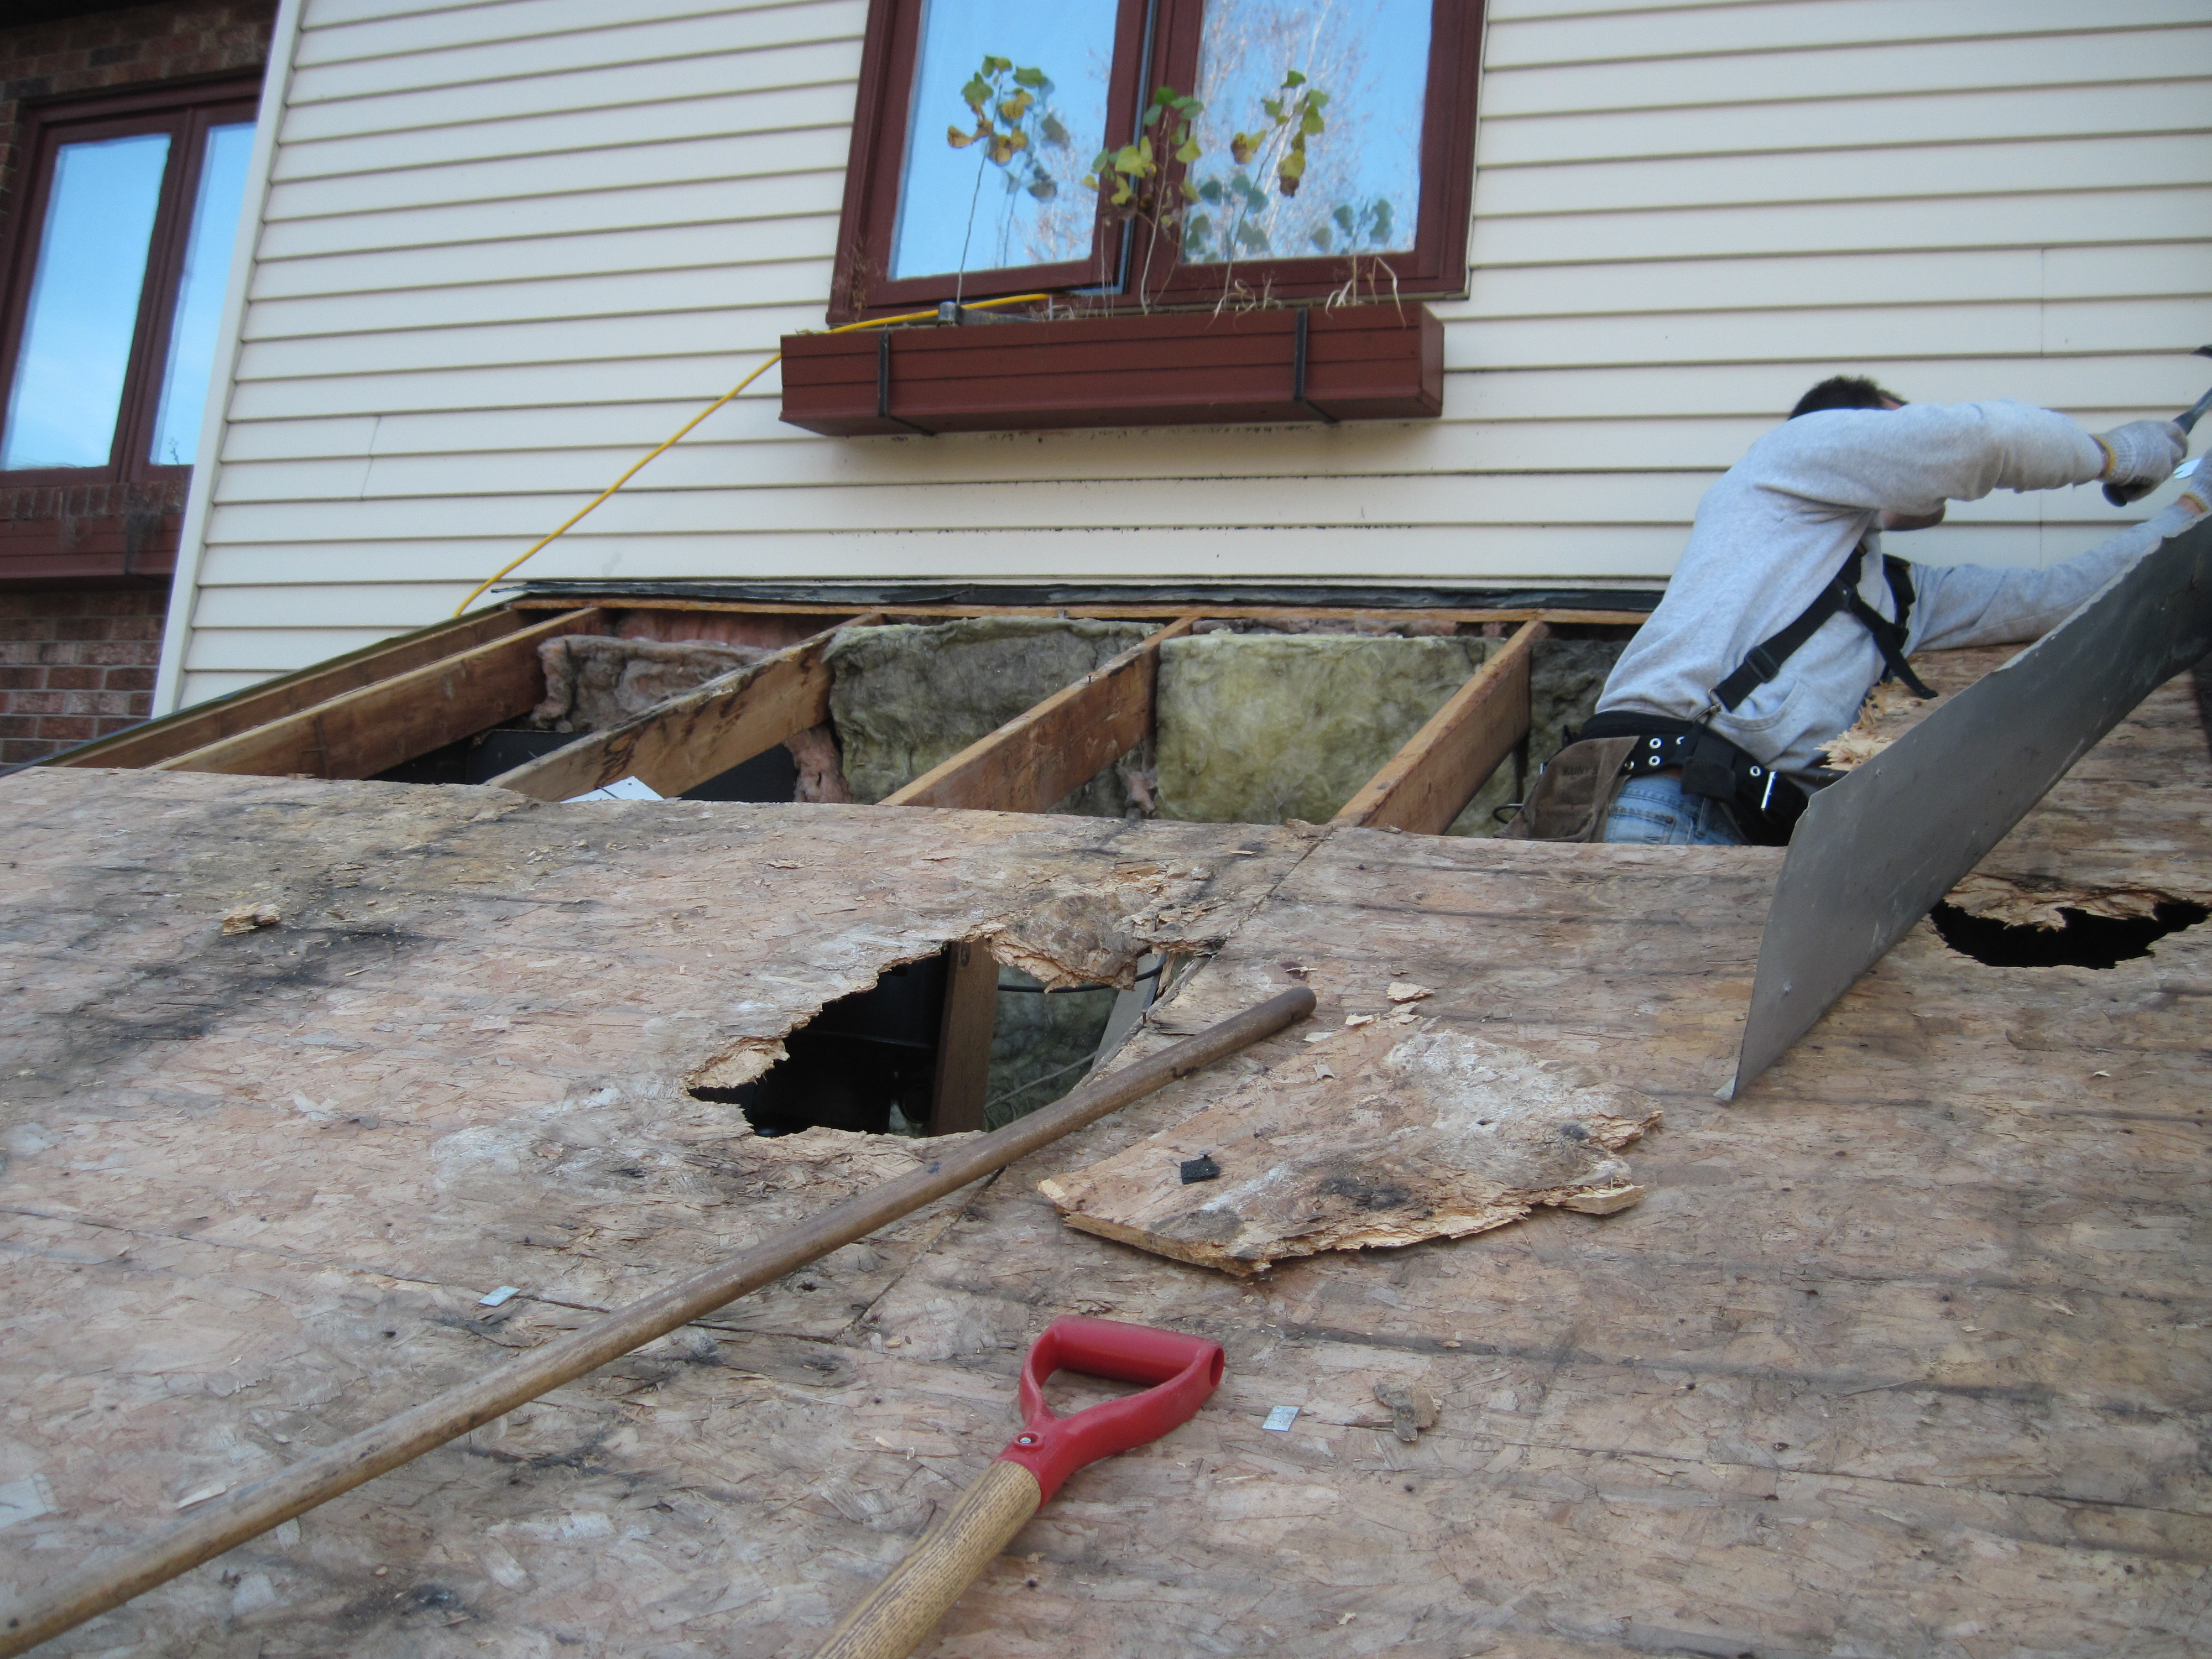
In the above case, the plywood decking lost enough integrity to require complete redecking.  Fortunately, the mold inside the attic was minimal (due to decent ventilation that ended up drying the moisture as it seeped in), so additional measures of removing the insulation were NOT needed.  The cause of the problem was the failure of the roofer to install appropriate underlayment, and to take into account the slope of the roof and the way the roof system worked.

 How do you avoid this kind of damage?

There are two solutions:

  1. Choose installers who take the time to do it right, who are aware of the weaknesses of each type of material they work with, and who provide the proper second (and third) line(s) of defense in anticipation of strong weather events.
  2. Choose products and installation methods that have a proven track record of preventing the kinds of damage seen in these photos.

Elsewhere on this blog (in the articles section), I’ve posted an article on how to get a good quote for your roof.  What is relevant to this section is the degree of care the prospective roofer pays to understanding your actual situation, and to ensure that the resulting quotation addresses all of the needs.  It should be clear that in most of the above cases, work was done in a hurried manner, without consideration of how failure could occur, and without providing for adequate countermeasures to these modes of failure.

The most effective way to avoid having to worry about blow-off, is to use products and installation methods that CAN withstand wind damage, and associated issues such as damage by wind-driven rain.  These products and installation techniques are more expensive than what one would pay for conventional asphalt shingles, but they look expensive only when ignoring the true durability and the true cost of repairing damage caused by poor choices.

If you are tired of worrying whether your roof will protect your home from the next wind storm, give me a call to explore the options that you need to consider.

(c) 2014 Paul Grizenko

Update (January, 2017):  This article has had thousands of views.  If you have some specific questions on any aspect of the discussion above, please use the comment form (next to the post title) to post the question or comment.  All comments are moderated, and will appear after review and approval.


Roof Leaks – causes and fixes

The most common symptom of a roof leak is bubbling paint or stains in the ceiling gyproc.  Sometimes the leak appears at the ceiling/wall joint, sometimes it is becomes visible at the seam tape between the gyproc panels.  At times, it is not subtle at all, with a large amount of water running down the walls or dripping onto your floors.  Other times, the leaks are very subtle, and don’t show up as interior damage at all, but do let water into the attic or the cold spaces.

Leakage from ice dam appears in several places.

Leakage from ice dam appears in several places.

The first thing to figure out is whether this problem is new, or whether it has happened before.  If you’ve lived in the same home for more than a few years, and you’ve never seen it before, then chances are excellent that something changed recently, and therefore contributed to the leak.  If you’ve been in the house for under two years, then it is possible that the former owner did not disclose the history of prior leaks, and therefore the leak you see for the first time, may in fact be a long-standing issue that was hidden by new gyproc and/or paint.

There are many possible causes of roof leaks.  For “new” leaks, common causes are:

  • ice dams
  • gutter/eavestrough icing
  • wind damage to roof cover
  • failure of caulking or sealant
  • physical damage to the roof surface by falling objects or ice
  • failure of a waterproofing layer
  • installation of a bathroom, kitchen or drier outlet into the attic
  • Installation of pot lights or recessed ceiling lights

Other leaks, especially if they have been present for a while, are often caused by:

  • poor installation of waterproofing layers
  • poor design and/or installation of flashings
  • use of inappropriate products to cover or waterproof the roof
  • incorrect amount of ventilation and/or insulation for the roof design
  • poor detailing of roof penetrations (air vents, plumbing vents, electrical poles, etc.)
  • poor design of roof/wall flashings
  • leaks in caulking at window and skylights
  • poor placement of vents and other roof openings relative to wind direction
  • condensation

If there were short-cuts taken during the installation of the last roof, then these usually contribute to making the original problem worse.  For example, some roofers advocate leaving the old roof on because it gives “extra protection”.  When a leak DOES happen, then the layers of old roofing provide an additional path for water to run in different directions.  Other times, they “save you the cost of new flashings” and reinstall the old flashing – this works until the water finds the holes.  Still other times, the various materials were not installed according to manufacturer directions, and therefore did not provide the appropriate waterproof seals that were expected (this is a common installation failure for waterproofing membranes).

Old shingles left on, contributed to channeling leak to different location

Old shingles left on, contributed to channeling leak to different location

It is common to find that there is not a single point of failure, but a series of weaknesses that contributed to allowing the leak.  For example:  The primary cause is an ice dam, which allowed water to find a poorly-caulked joint, when then ran onto waterproofing membrane until it found an open seam, and then into the roof.  Once it entered the roof, it ran on the underside of a beam until it came across a supporting strut, at which point the water dripped down onto the insulation, and through the insulation onto the vapour barrier.  Then it pooled on the vapour barrier until there was enough to direct it to a gap in the vapour barrier, and onto the gyproc.  It finally showed up as bubbling of paint on a gyproc seam.  Where it came in can be quite far from where the leak actually occured.  So when looking at a source of the leak, it is necessary to play detective, and follow the water trail.  Sometimes it is quite easy.  Usually, it is not.

In the above example, the solution (short-term), would be to remove the ice dam, and to dry out the accumulated water on top of the vapour barrier.  However, the long-term solution is to add enough insulation to prevent the melting of snow in the first place, then have enough ventilation to remove any residual heat leaking past the ventilation and any moisture that may be entering the attic.  When the roof gets redone, the membrane needs to be properly applied (right product, right installation method, right location), following by the appropriate flashings, and finally counterflashings and caulking.

In some cases, we’ve seen roof covering deteriorate to the point that water is freely running on the underlayment, and every gap in the underlayment allows entry of water through the nail-holes and other breaks in the underlayment surface.  If the decking is made from OSB (Oriented Strand Board) of the Exposure 1 grade, then there is a high probability that the decking will be damaged extensively as well, and will need to be replaced.  If the leakage has occured over a period of time longer than one year, then there are also mold issues to consider.

In short, a leak is telling you that there are potentially major issues to be dealt with.  Before throwing money at the problem, take the time to figure out what’s actually going on, and what the priorities should be in terms of fixing the problems in both short and medium terms.  If you contacted your last roofer and he claims that there’s no problem (that he’s responsible for fixing), maybe it’s time for a second opinion.  After this, you will have a better idea of what the problems may be, and what would be a reasonable approach to getting them resolved.

(c) 2013 Paul Grizenko

Climate change and your roof.

Whether we believe that human activity has caused or contributed to climate change, the simple reality is that the weather is not the same as it was before.  The warming of the atmosphere promotes more evaporation, and this brings an increase in the energy contained in the atmosphere.  More energy means more variation, with larger movements of air, stronger atmospheric pressure variation (both highs and lows), heavier precipitation, and much more wind.

 In practical terms, this means that winds of 80+ km/hr will be more common, and we should expect at least several times a year when our roofs will see winds of 120+ km/hr.  In terms of precipitation, heavy downpours of 30-40mm per hour may be more common, and need to be planned for.  We can also expect heavier snowfalls, and rapid changes in temperature.

 So…  how is your roof set up to handle these weather conditions?  Probably not all that well.  If your roof was put together to meet the minimums in the building code, which was based on data accumulated prior to the 1980’s, then your roof is built to deal with conditions that have dramatically changed since that time.

 The typical roof failure we’ve seen in recent years include:

  • Shingles blow-off
  • Water infiltration due to wind-driven rain
  • Damage to fascia, soffits and siding
  • Leakage due to rapid melting of snow accumulating on the roof, then refreezing,
  • Leakage due to volume of rain overwhelming the gutters, and backing up the eaves, valleys and end-walls,
  • Excessive wear on shingles from water falling from a higher level
  • Excessive drying-out due to prolonged heat and sun exposure
  • Caulking failures around chimneys, skylights, vents and other roof features
  • Excessive snowfalls with up to 24″ or more of snow accumulation requiring snow clearing to reduce the weight on the roof.

 It would be a good idea to verify that your roof system can cope with the new conditions, and if weaknesses are found, to determine the best way to “fortify” your castle.  If you wait for a news-worthy weather event to damage your roof, you may be looking at a very expensive repair bill, not to mention inconvenience and even some personal danger.

 If you haven’t considered it before, maybe it is time to look at some of the newer products and installation methods that have a much better ability to cope with the temper tantrums that Nature seems to throw more often.

 At the very least, you may want to look at the incorporating layers of protection that should allow your roof to withstand the more extreme events.  Each roof behaves somewhat differently, so an inspection is usually needed to establish the potential weaknesses, and the appropriate counter-measures.

(c) 2013 Paul Grizenko

You have OSB as your roof sheathing. Do you cheer or panic?

That depends on what grade the OSB panels are, and whether the right panels were installed.  OSB (which stands for Oriented Strand Board) is a variant of plywood, and is an engineered product, meaning that each type of OSB panel has defined end-use and method of application.  Information on the types of panels and their uses can be found here:  http://www.apawood.org/level_c.cfm?content=pub_osb_libmain

The panels are manufactured in two grades: Exterior and Exposure 1. “Exterior panels have bonds capable of withstanding long-term exposure to weather.”   The Exterior 1 grade “is intended to resist the effects of moisture due to constructions delays or conditions of similar severity”.  Which means that if the OSB panels have been installed as roof sheathing, then a few days exposure to the weather is permissible before the tar paper or other underlayment is installed.

If the roof panels  are Exterior grade, then you have nothing to worry about.  Most of the panels installed as roof sheathing, however,  are Exposure 1 grade,  which means they CANNOT be exposed to long-term moisture.  That is fine, as long as the roof doesn’t leak, or condensation doesn’t happen.  Leaks, when they do happen, generally start gradually, and it may be several years before a leak is detected.  By that time, the OSB has been exposed “long-term” to weather (which in this context, means water), and therefore the glue holding the wood chips (strands)  together starts to dissolve.  This leads to the weakening of the panel, as well as causing it to swell and buckle with absorbed moisture.  Persistent condensation will do the same.

In short, if you have Exterior grade OSB, you can change your roof when it’s due – the panels should not be affected.  If you have Exposure 1 grade, then you should carry out a regular program of attic inspection to ensure that no water is getting in.  Otherwise, the cost to reroof may have to include the cost to redeck the roof, and do whatever mold remediation that is necessary.

OSB damaged by persistent leakage, being removed.  Note the dark stains in the insulation.  It too will be removed.

OSB damaged by persistent leakage, being removed. Note the dark stains in the insulation. It too will be removed.

From another installation / repair, we had very localized leakage, but it ended up ruining that piece of OSB.

Damaged OSB.  Leakage was localized but still need to be redone.

Damaged OSB. Leakage was localized but still need to be redone.

If you’re not sure of what you have, or if you know you have OSB but aren’t use what state it is in, give us a call.  We’ll do an inspection and tell you our opinion.

(c) 2013 Paul Grizenko