Spray Foam – good or bad?

Closed cell-spray foam used as insulation, has been on the market since about 1979, and has gone through a number of evolutionary steps.  The product is a solid plastic, formed by the chemical reaction of two primary components:  an “A” side which is isocyanate, and a “B” side which is usually a mixture of oils, stabilizers, fire retardants, blowing agents, and colouring agents.  The reaction is exothermic (ie, generates a lot of heat), and the materials form a solid within seconds. The blowing agents are the compounds which produce the low-conductivity gas that forms the bubbles in the foam, and thereby form the primary insulation.

When applied to a minimum thickness of 50mm (slightly under 2 inches), the material acts as  insulation, vapour barrier, and an air barrier.  Newly-installed foam has R-values of R-6 to R-7.5 per inch, but this diminishes to about R-5 per inch over time as the insulating gas dissipates.  Compared to other insulation products like fiberglass bat or mineral wool bats, the product has more insulating value per inch, and resists the loss of heating value that sometimes occurs with loose insulation due to air convection with extreme temperature differences.

The ability to prevent air and vapor movement is generally a good thing, except in situations where moisture can enter a wood structure, and then cannot get out.  Therefore the short answer to the question in the header is “spray foam is good when PROPERLY installed, and BAD when installed in inappropriate places or in an incorrect manner.  There are also issues of the impact on the environment, and potential impact on the health of the people living in the homes where the product is used.  The rest of the post touches on some aspects that inform whether the installation is good or not.

Continue reading

Condensation

Condensation plays the same role in “modern” roofing practice as “bad spirits” did in medieval times.  If something went wrong, you blamed the bad spirits.  Nowadays, if a roofing system is not working, it’s due to “condensation”.  So let’s get into it and understand what condensation is, when can it appear in a roof system, and what corrective action you can and should take if condensation is really the cause of an apparent leakage.

Continue reading

What is condensation?

If you listen to some people, you’d think that “condensation” is the satanic miasma that descends upon the undeserving, punishing them for sins committed in prior lives (or capriciously,  for no reason whatsoever).  In the field of roofing, roofers will look upon an afflicted home and suggest various remedies, many of which are no better than burning chicken entrails under a full moon, or uttering incantations banishing the spirits from the crevices in which they took refuge.  It is also quite common for all kinds of building mischief to be blamed on “Condensation” hence informing the suitably-impressed home-owner that they are in the presence of a superior intelligence.

Fiddle-sticks.

Continue reading

Maintenance for your roof

There are several aspects to maintenance.  Preventive activities look for possible weaknesses and starting signs of deterioration.  Remedial activities repair or remediate things that started to fail.  Replacement activities are appropriate when incremental repairs don’t do the job any more.  Some of these activities can be easily done by the homeowners, others should be done by professionals.  Let’s have a look at this in more detail.

Continue reading

Skylight leaks – no, they don’t have to.

The skylight is a wonderful enhancement for homes, bringing in natural light to dark areas, and increasing the feeling of “openness” in a house.  However, skylights also have a bad reputation due to problems of leaks and condensation.  Fortunately, if the skylight is of good quality and is properly installed, then you should have all the benefits without suffering the usual problems.  This post discusses some of the issues in preventing problems with skylights on steep roofs.

Why do skylights have a bad reputation for leakage?  It’s probably due to the fact that the roof and the skylight were installed by different people, and the demarcation line between the two is rarely clearly indicated.  That means that one or the other probably didn’t take all the possibilities into account when doing the installation and waterproofing.

How a skylight fits in a roof.

How a skylight fits in a roof.

For a skylight to work effectively, without causing condensation or leakage, the light well must be sealed with a vapour barrier, and insulated at least to the same level as the ceiling.  Then, the dew point will be located in the insulation, and will not contribute to condensation moisture.

The pink area shows the presence of the interior air which is warm and humid.  The cyan area represents the cold attic (and wall cavity) air.

The key elements in keeping the skylight (#3) from causing condensation problems are shown below:

1. Vapour barrier which prevents moisture from internal air from leaking into the cold  spaces.

2. Insulation appropriate to the climate zone, which is of sufficient thickness and effectiveness to keep the dew point inside the insulation.

3. The skylight itself should be at least double-paned, with a sealed interior space to prevent condensation within the skylight.

4. Outside curb wood

5. Insulation between inside and outside curb structure.

6. Inside curb wood.

If your skylight well is properly insulated and has a good vapour barrier, then condensation should not form inside the well itself.

Once the skylight is mounted on the roof, it has to be well sealed.  An example of appropriate installation methods is shown at the Velux web-site (here: http://www.velux.ca/en/professionals/installation_and_training/installation_help/installatin_instructions).  The waterproofing consists of a good application of membrane (Grace I&W Shield or equivalent) around the entire curb box of the skylight, with field-formed flashings sealing and protecting the membrane.  Then the skylight flashing kit is usually used on the outside to complete the installation.

If a skylight is installed after the roof is already in place, then ensuring that enough waterproofing is installed becomes a key concern.  As mentioned in other articles and blog posts, membrane has to be installed in a correct manner for it to work.  That includes priming non-wood places and/or where the membrane may not bond directly to wood.  There must be proper overlap between membrane layers, and the membrane needs to be fully adhered to ensure water-tightness.  Once the membrane is in place, custom flashings are usually field-formed to envelop the skylight curb and to protect the membrane. Then the skylight trim flashings get installed over this assembly.

Therefore, one common cause of skylight leakage is the failure of the flashings and/or waterproofing around the skylight curb.   Another is the use of the incorrect flashing for the roof type you may have.

Skylights sometimes also fail because the seals that are installed at the factory, become dislodged, dry out, or shrink, causing a place where water can enter.  If this is the case, it is usually most prudent to replace the skylight unit.

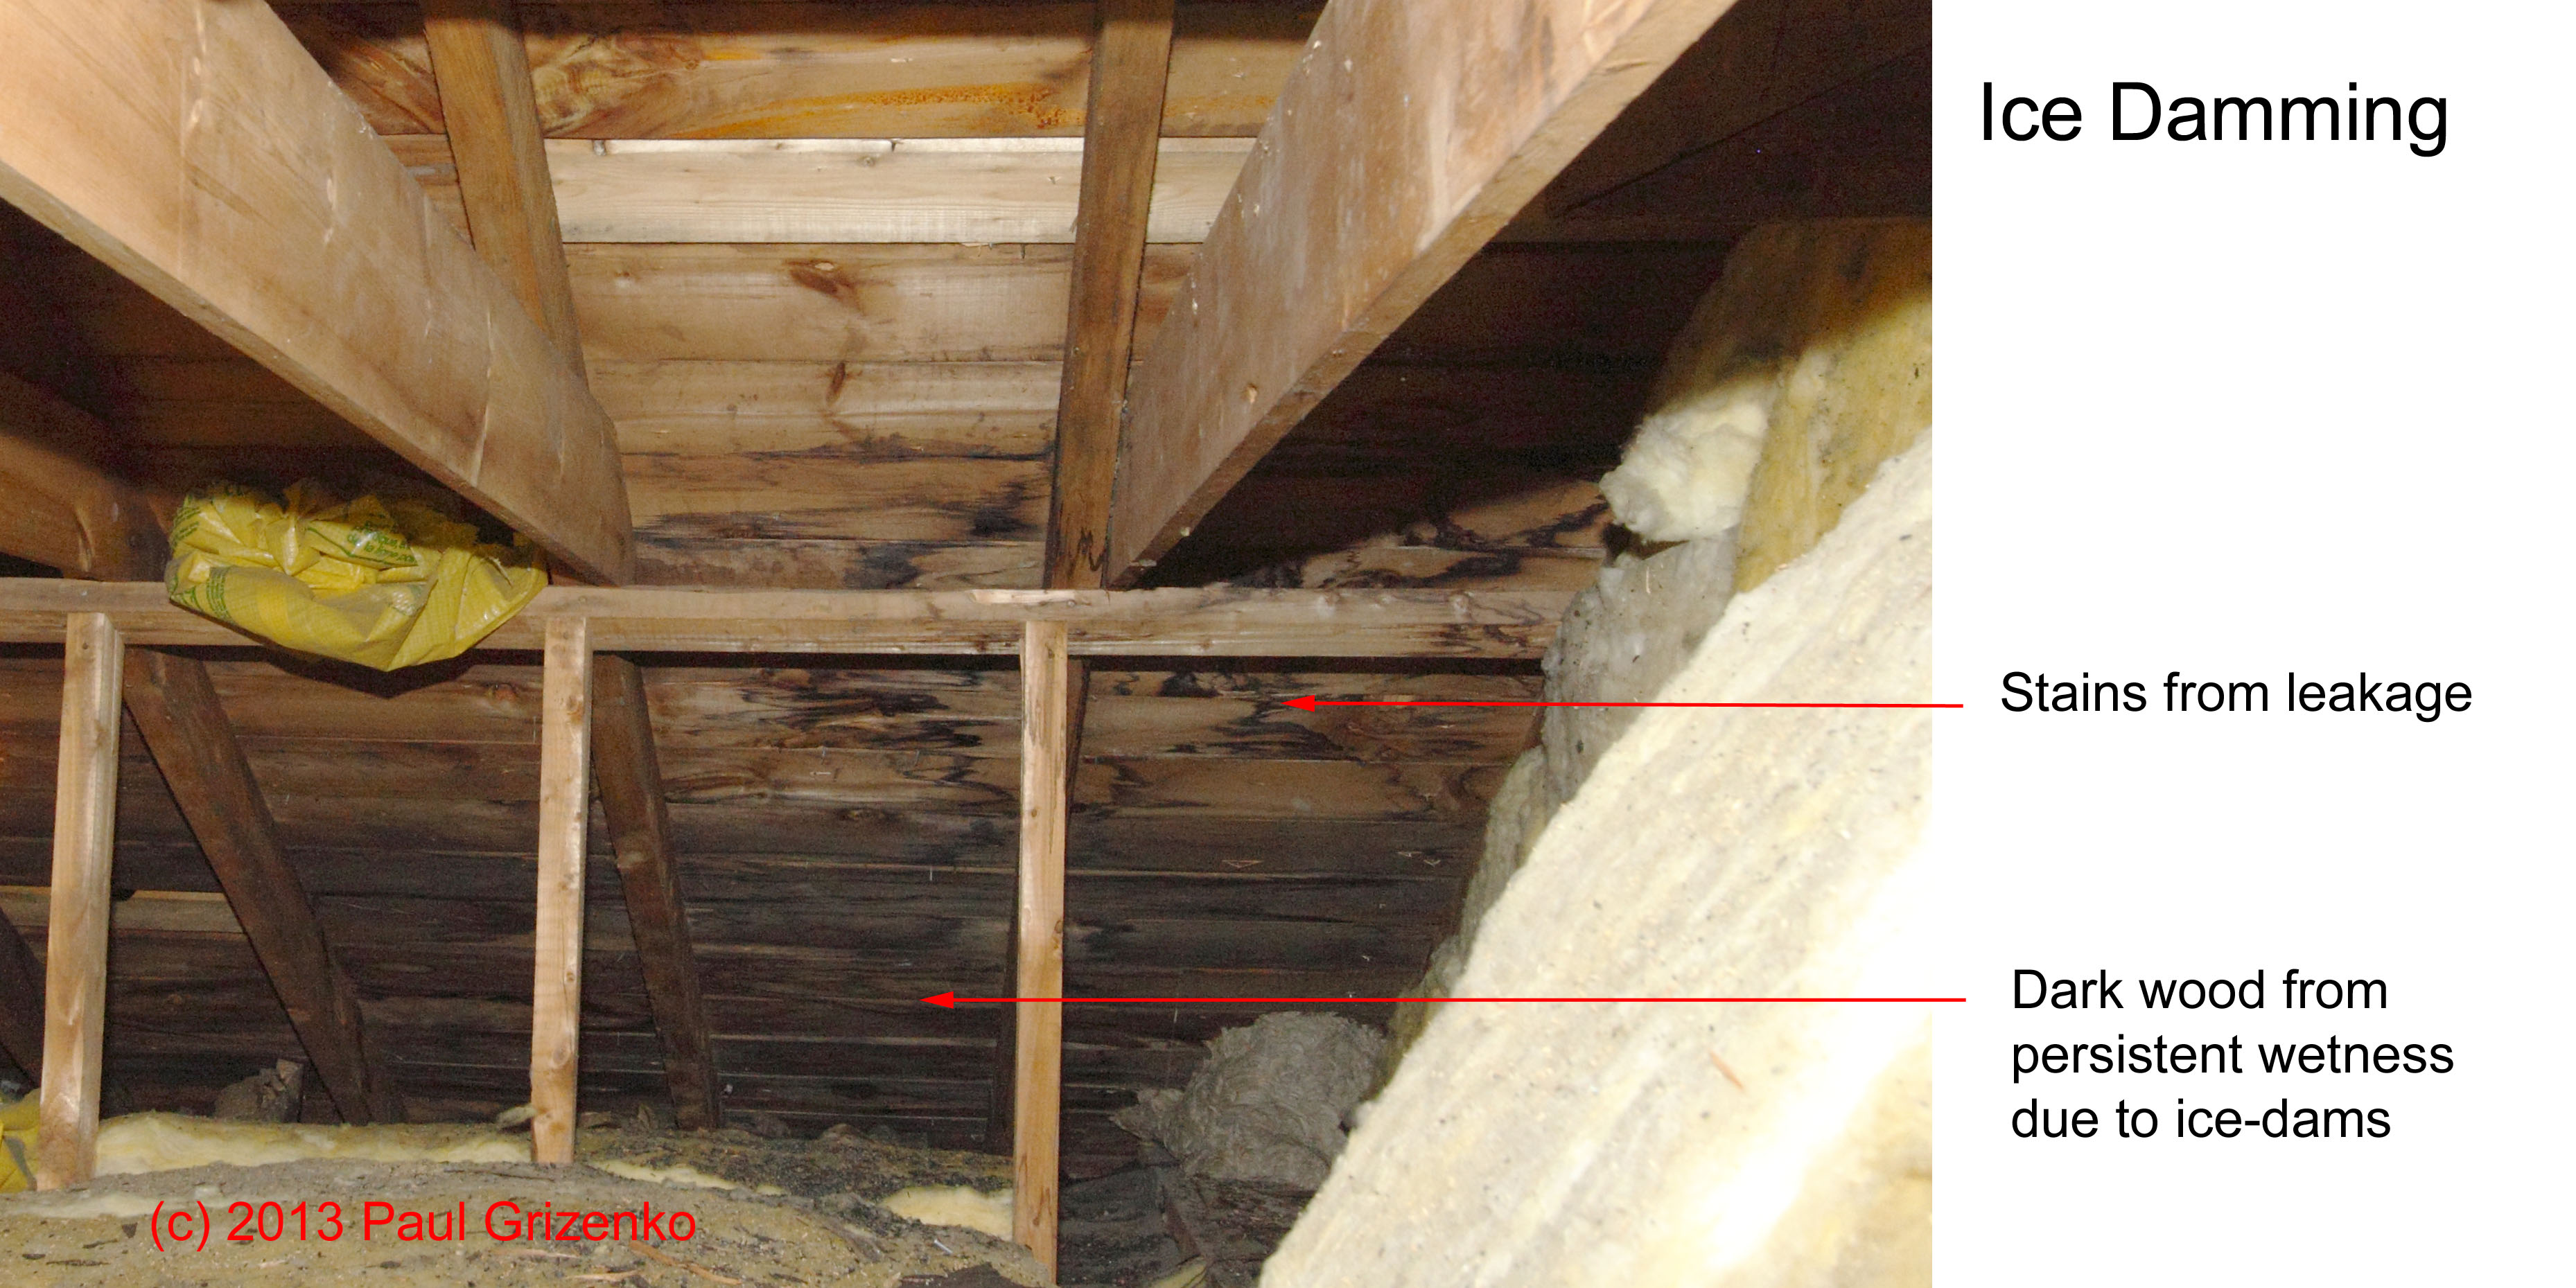
Since skylights form a rather large obstruction to water/snow/ice flow on a roof, it also happens that a local ice dam forms at the top of the skylight, and if the waterproofing was not run far enough both up and laterally, you can get leaks.

If you have a “leaking” skylight, the first thing to investigate is whether the leakage is condensation.  Once that has been ruled out, then the seals around the skylight glass need to be checked.  After that, it is the exterior waterproofing that is looked at.  However, the latter is possible only when the roof is dry and not covered by snow or ice, as the flashing covers of the skylight have to be removed to see the exact condition of the waterproofing and the flashings.  If you’re not sure what’s going on, give us a call.

(c) 2013 Paul Grizenko

When is a roof leak not a leak?

Image

We were asked to investigate this leak.  It turned out to be due to condensation.  The pot lights were added much after the construction of the house, and the installer did not use an air-tight insulated box for each light.  As a consequence, warm and humid interior air entered through the pot-light enclosure  into the ceiling cavity, and with minimal insulation left (because it was mostly removed to make room for the pot lights), there was a LOT of condensation.

The do-it-yourself remodeller also made similar mistakes elsewhere in the house, piercing the vapour barriers, and not allowing any air circulation above the insulation.  As a result, the interior air infiltrated the cold spaces and almost “rained” condensation into the interior.

In the section https://prsconsulting.wordpress.com/links-and-useful-information/, there is a link to a very good article in Fine Home-building Magazine which discusses ventilation issues and has some nice diagrams showing show how the ventilation should work.

We also have had reported leaks in bathroom fans, which turned out to be condensation, and other “leaks” which turned out to be condensation from poorly insulated air ducts conducting cold air (in summer, obviously).  So when you spot a “leak”, it may not be what you think it is.  Time to do a little sleuthing.

(c) 2013 Paul Grizenko

It’s winter. And you have a roof problem. Now what?

In Quebec, winter provides all kinds of challenges to your roof, from freezing rain, to severe temperature changes, to strong winds, to very cold temperatures, to snow accumulation, to rapid  ice/thaw  cycles.  With the climate change that we are all living through, the weather extremes become more pronounced and more frequent.  If your roof is not well-designed and well-installed, the weather will find the roof weaknesses, and you WILL have problems.

In winter, the most immediate problems are usually leakage and ice damming.  The longer-term dangers are caused by leakage, condensation, and snow accumulation.  Sometimes, wind can damage poorly installed flashings or soffits.

If you have leakage, there are a number of possible causes:

  •  ice-damming,
  • caulking failure,
  • flashing failure,
  • underlayment or membrane  failure,
  • failure of waterproofing seals,
  • incorrect choice of vents and vent positioning,
  • aging of key components that no longer keep the water out,
  • fastener seal failure,
  • blocked valleys,
  • blocked gutters,
  • internal condensation
  • and other causes that are not as common.

The first step is to figure out why you have a leak when you had none before.  As can be seen from the above list, there are many things that can cause an apparent leak.  Each possible cause has its own set of diagnostics, and leaping to conclusions usually ends up costing money and doesn’t fix the problem.   Finding a leak can be particularly challenging if the roof system was not well built, or if the water has travelled along the vapour barrier.

Ice Dams can appear even with well-built roofs, if the conditions are just right.  However, they usually signal a combination of insufficient insulation and ventilation.  Older homes, built under codes that were not as stringent as they are now, often have ice dams and massive build-up of icicles decorating the roof eaves.  Once the water starts building up behind the ice dam, it is under pressure, and enters any opening, crack, or gap.  If the waterproofing is not perfect, you have a leak.  If the roof was built with multiple levels of protection, then the water at the ice dams usually stays outside, but if there is only one layer of protection (typical of cheaply-built roofs), then there is no margin of error.  Any failure in that one layer will result in a leak.

Occasionally, “leaks” are caused by condensation.  How is the moisture getting into the attic or cold spaces in the first place?   We find any number of reasons when we start looking for causes – but almost always, it is due to some error in venting, or in a seal that is no longer working.  We’ve seen bathroom renovations where the contractor directed the air vent from the bathroom directly into the attic, and more than one case of clothes drier vents being installed with their outlets inside the roof system.  We’ve also seen home renos where the potlights were installed in ceilings without the proper sealing, and ended up causing massive amounts of condensation by letting in the air from the living space into the cold spaces.

So, what do you do when you think you have a leak?  Call an expert – we’ve seen more of the underlying causes and reasons than you ever will (unless you are really, really unlucky), and we’ll know where to start looking.  Depending on what we find, we may be able to fix it quickly, or we may suggest some temporary measures until we can fix it properly once the snow is off the roof in spring-time.  Under extreme situations, we can (and have) rebuilt roofs in winter, so it is possible to do, but it can get expensive.

The best way to not have these problems, is to make sure all the fundamentals are working correctly.  That means ensuring that your vapour barrier is effective and complete, that you have enough insulation of the right type, that your ventilation is set up in a manner appropriate to your style of home, that there is the right amount of waterproofing (membrane and seals) in all the places where water can appear, and that there is the right layering of protection (membrane, underlayment, flashings, caulking) in all the susceptible areas.

Your home is your most important investment.  Shouldn’t you have the best protection for it that you can have?

If you’re not sure you have it, contact us and let us arrange an inspection.

(c) 2013 Paul Grizenko

Ice dam as seen on the outside - lots of icicles!

Ice dam as seen on the outside – lots of icicles!

Image shows leakage and persistent wetness of the decking.  Water has entered insulation and the gyproc underneath.

Image shows leakage and persistent wetness of the decking. Water has entered insulation and the gyproc underneath.